
My Paper Mache Dog
Hi everyone,
Okay, I’m finally back with a non-dragon project. As I mentioned in an earlier post, I want to make a dog. I’ve made a couple over the years. And I love dogs. I have seen some amazing paper mache dog art. My friend Sue Mclearie for one. And Marci Forbes (Papierdog). But what made me want to make another dog is this old guy. I snapped this photo of him in front of a Starbucks. What a sweetheart.


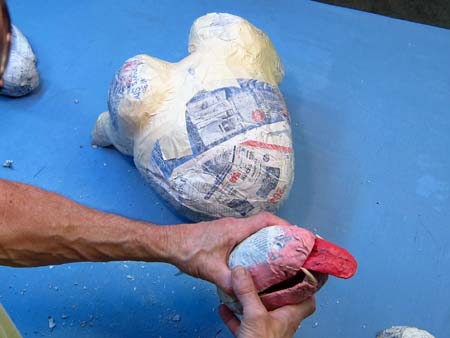
First, make the jaws. As always, I split a paper mache ball and pull out the wad of paper. In this case I didn’t want a mouth full of teeth. Just the two canines. So I hot glued a couple of small teeth onto the bottom jaw. And I wanted a long, dog-like tongue. I started with two pieces of wire clothes hanger.


I twisted newspaper around both wires and then added a piece of masking tape along the back.


That preserves the crease in the tongue. Then I added some bends.


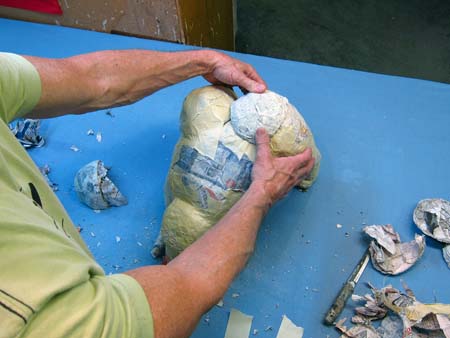
Next, I picked out a couple of balls that will be the upper thighs, and a couple for the lower thighs. Yes, that’s what they are called on a dog. I cut open the bigger paper mache ball and pulled out the wad of paper. I do this whenever I can to make the project a bit lighter. I usually reuse the wad of paper later.


It doesn’t really matter to me if the pieces are all exactly the same shape and size. One of these smaller thighs is bigger than the other. So I’ll just cram the bigger one further into the upper thigh than the other. I put the two thighs together and added tape. Then I cut up another ball (they aren’t really balls, but I don’t know what else to call them. They are smaller, more elongated shapes.) and used part of it for the upper part of the foot. Well, it’s actually called the rear pastern. The hind foot will stick out from there. Sorry, this isn’t easy to describe.


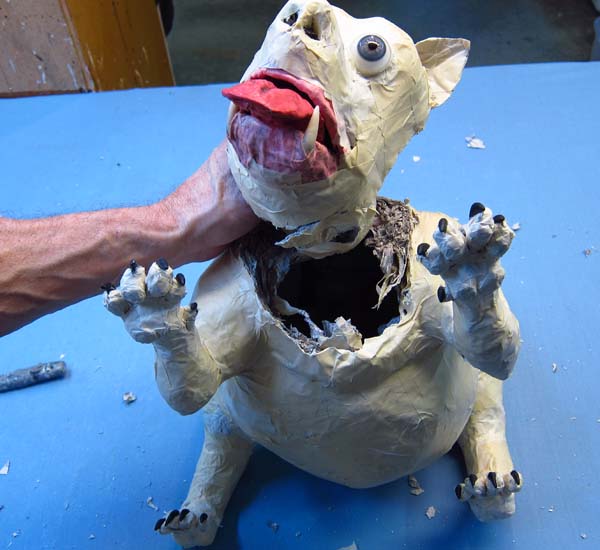
Now I have two hind legs ready to go. Next, I cut two fairly large holes in the body for these legs. I break the shell in between so that I can pull out the big wad of paper inside. Again, I wrap that wad of paper with tape and throw it into a box. Then I have ready made wads of paper to mache for later projects. It’s a really nice system I think.


I tape the shell back together. Everything is significantly lighter now. I put one leg into one hole and tape.


Then the other. It still doesn’t look like much. Trust me, it will look a lot better soon.


Paper Mache Bulldog: Assembly


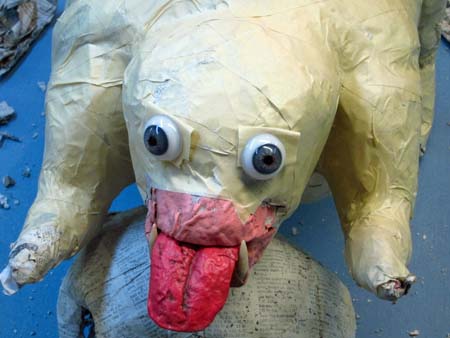


Okay so this really looks like a pig at this point. And the tongue looks gigantic. That’s one of the things about making sculpture using these methods. You are sculpting a face without skin. And that’s the way it looks. Ugly.


I fashioned a foot out of a wad of paper and added the toes. One last pinky on the side. Is is a “pinky” on a dog? I added some pads to the bottom of the feet.


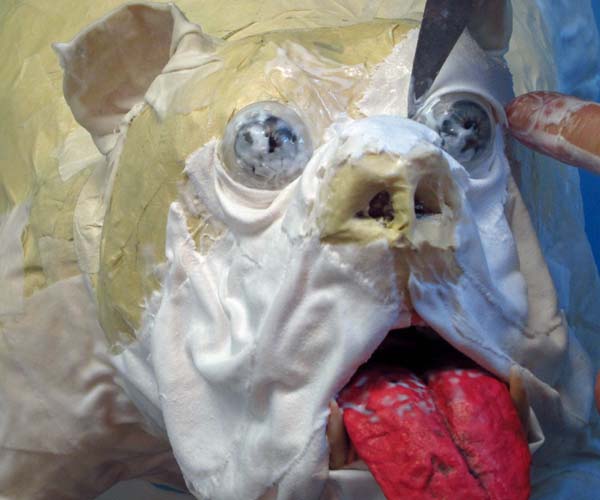
As I mentioned in my previous post, I started equivocating about eyes. All of you artists out there know how neurotic that can get. Back and forth, back and forth, brown, blue, cookies. Brown fox eyes, or slightly bloodshot boar eyes, or blue human-ish eyes? Obsess, change my mind, graham crackers (instead of cookies, but still 70 calories apiece!)(this was about a 2000 calorie decision.) After all of that, I decided to keep the blue.

I cut some ear and nose holes. Then I made some slits in the toes so that I could add claws.


I added the claws. I made black ones. It turns out that bulldogs have either black or nail colored claws. At this point I wasn’t happy with the position of the head. I wanted a kind of frisky look to this dog, with his head down and his butt in the air. But his head was too low to the ground. I decided he needed to be looking up a little. So I grabbed the knife……


…and off came the head! This will surely be the photo that shows up on Google images when someone searches “dog”. I added to the existing head hole. Nothing cute here. It really looks like a pig’s head! I was listening to NPR the other day. They were reporting about “Ramen festivals” that are springing up around the country. Not the Top Ramen you get in the stores, but some fancier kind of ramen. She described all these people making broth, all these big pots with pig heads floating in them! That’s how they make the broth! Sorry, as a vegetarian that would send me running. Of course I don’t like most vegetables either. I run from Brussels sprouts.

Much better! I had to add some rolls of skin under the chin the fill in the gap.


Time for the skin. I started my cloth mache on the underside. First the bottom of the feet. Then the entire underbelly.


Paper Mache Bulldog-Final Cloth Mache
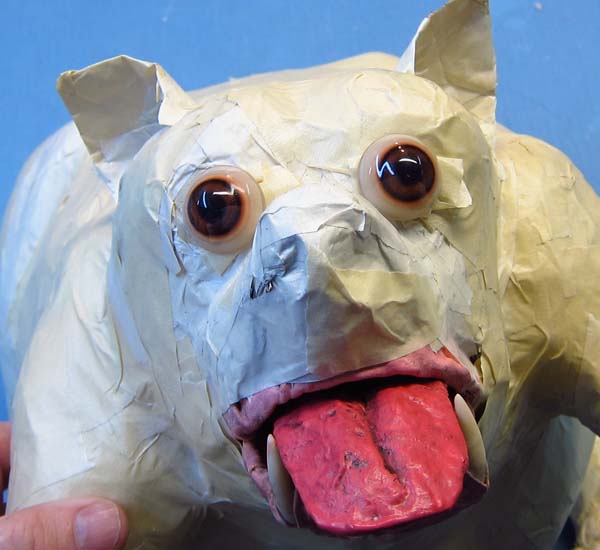
Well, it’s time to make this little guy a bulldog. When I used to teach art to kids, I would warn them that much of making art was “grunt” work. It was not thrilling, just hard work. But this is one of those days that IS thrilling, when a project finally starts to look like I envisioned (or at least would surprise me in a good way). I’m going to add the “cloth mache” skin to the face. I started with the ear. I poked a piece of cloth into the ear hole, then smoothed it over outside of the ear. That always makes really nice ear wrinkles, as nature does. Why? Why the wrinkles in your ear? Ever wonder about that? You should. It’s strange.


Next, I folded a piece of cloth to make the lower lip. Not much of this is going to show. I added a little more cloth to the upper gums. Don’t know why. Now for the floppy, extra skin that defines a bulldog. I used a fairly large piece of cloth that I folded several times to get some thickness.


I started up by the nose and looped it toward the cheek. I can’t show this here, but I played with those wrinkles for a long time.


Then I added a piece of cloth to the bridge of the nose. I crumpled it up to get some wrinkles over the nose. Then the eyes…I added upper and lower lids using pieces of folded cloth.


Paper Mache Bulldog: Painting


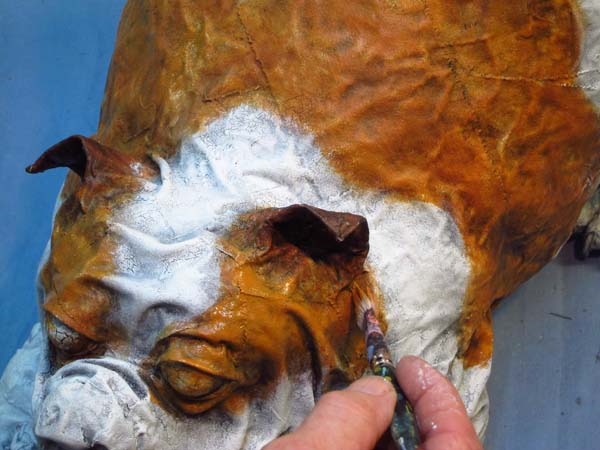
The trick here was not to get too carried away. A bit of brown here, a bit there. Some around the eyes. That will look really good with the blue eyes. Because there is so much white on this dog I needed to be very careful with the blackwashing. I watered the black significantly more than usual.


Again, because I didn’t want to over do (overdo?) the blackwashing with so much white, I was careful to do it in sections. I didn’t want the black paint drying before I could wipe it off. So I blackwashed the face first. Then the rest of the body. I know there is resistance to blackwashing out there. I hear it all the time. The initial paint job is soooo pretty! You don’t want to ruin it. If it really bothers you, don’t do it. It’s just my preference. I always think it looks better after blackwashing. It accentuates all of those details I worked so hard to get. This is particularly true with this dog. These photos don’t do the process justice. You will see this more clearly when I post my final, high resolution photos.


No matter what, I always add back color, some highlights. Just a bit of paint on my brush. I hit the high spots and places I just want to brighten up.

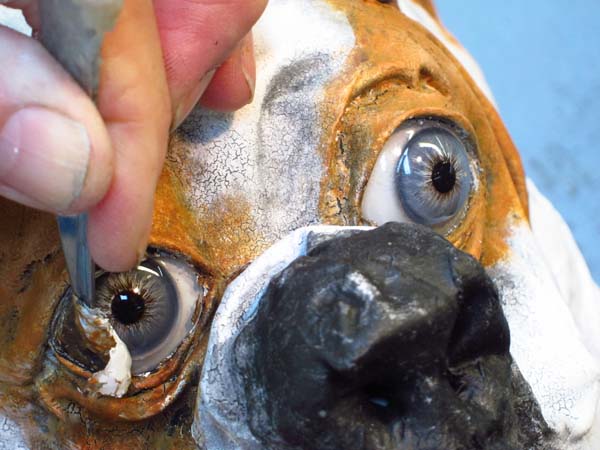
I painted the nose and added some black to the lips, just like the dog in front of Starbucks. What a difference that made! Then I touched up the tongue. By the way, a good tongue can really enhance a project. I think a long tongue really helped this sculpture.


I scraped the white paint off of the toenails. Then, hold your breath (I did), I scraped the paint off of the eyes. I swear, he came alive. It was thrilling. I’m so glad I kept the blue eyes. I also made the eyes a teeny bit off center (relative to each other). I think it made him look cute. You will see that more clearly in my next post.

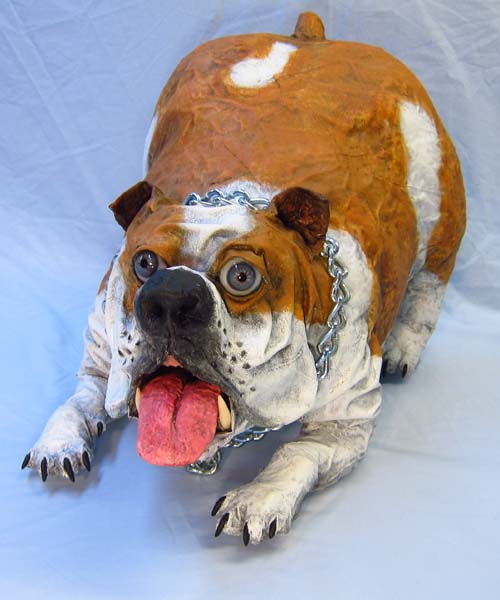
Paper Mache Bulldog: Done!
Okay, so my bulldog is done. For not being a dragon I kind of like him. It was fun. Here are a few photos. First from one side.
Then the other


I’m not sure what I’ll be making next. I’ve started another dragon, but I’m not sure I’ll blog about him. I’ll think about it. Thank you for all of your patience. I also made one of my usual time-lapse videos of the dog being made if you are interested. You can watch it here on Youtube.
PS. Remember to subscribe to my Youtube channel if you like this.
PSS. You won’t see any ads on my videos, or my blog, or my site. I hate ads. Just saying.

Thank you for your instructive video of the dog. I have volunteered to make a papier mache life sized dog riding a motorcycle for our local Humane Society’s new spay/neuter program. What was I thinking?
Hello Michelle. That sounds fun! And like a lot of work! The dog sounds fine. The motorcycle would be the hard part, at least for me. Good luck with your project. It’s certainly for a good cause! And I’d love to see it when you are finished.
The position of your dog is technically called a “play bow.” My dog wakes up every morning and once she stands up the next thing she does is a play bow. She wakes up ready to PLAY. When dogs do this around other dogs,there might be some growling going on, but if the butt is up and that tail is wagging, that dog is inviting the other to play. Just an FYI.
Thanks Joann! That’s nice to know!
He looks great. I was wondering if you have a book with him in it or the big blue dog I keep seeing. I’m kind of new to this at the ripe old age at 70. I have got your dragon books is there a better beginners book.
Hello Judy. My “Papier Mache Monsters” book is the most comprehensive book. I’m sorry you didn’t get that one first. I don’t have a specific chapter on the blue dog. The trophy I’m making here is no different in concept than all the trophies I make. Once you learn the techniques it’s all variations on the same theme.
Btw. I’m a ripe 65. There is still some time to learn a few new tricks at 70 I would hope.
Oh I got that one also. Maybe I’ll start with it. Lol. Thanks for the help
I always suggest starting with a monster so that you are guaranteed success. Your first project is about learning the techniques. The second project will be your masterpiece. Have fun!
Well I’m 72 and I would love to make him ……Where do I start ?
I think I did a pretty good job of showing every step of the process on this blog. Start at the beginning.https://papermacheblog.com/older-paper-mache-projects/bulldog-with-treat/
there is any video for the steps ??
I have the time-lapse video on Youtube. There is a link at the bottom of the post.
i opened it but there is error in the site
I don’t know why that happened. It is fixed now.
can you tell me the type of sheet you use ??
I just use old bed sheets.
i wanted to do this dog very much and i will do it inchallah and iam really do mask tutorial its very nice thanx very much for your information
You are welcome Samir!
i started to do bulldog but am confused about the pieces you do which one related to any part can you help me very important and i want to know the type of colors you use
Sorry Samir, I don’t understand what you are asking. I don’t know how to help about the pieces. I use all-purpose, water based paints, like you buy at any hardware store.
what type of colors ??
Sorry, I don’t know what you mean. The kind of paint? It is just all-purpose, water based paint. Anything will work. Just don’t use oil based paints.
i used plastic colors but it dosen wet in the cloth ( bed sheets )
I’m sorry Samir. I don’t know what you mean. Did you use acrylic paint? It didn’t stick? What happened?
Dan, do you do any kind of sealing on the inside, or on the whole piece once finished for that matter? I live in Florida, and humidity would have an impact on the dried pieces and the finished art, I would think, and I was wondering about sealing against humidity damage.
I haven’t sealed from the inside for indoor pieces. I did for my outdoor dragon (http://gourmetpapermache.com/2015/01/13/outdoor-paper-mache-dragon/). I haven’t heard anyone from Florida with problems like this.
Love the results. A couple of nice looking critters.
Glad you like this Lois! Thanks!
Can you tell me the all materials of this dog? I wanna try to make it cuz I have a bulldog!
It is flour and water paste with newspaper, masking tape, cloth and white glue, paint, eyes from taxidermist, clothes hangers.
Good luck!
Thank you very much! I hope I can show you my work when I’m done!
By the way what is cloth for?
Jesus Christ that is the most terrifying thing I have seen in a good long while.
Terrifying? I’ve heard lots of criticism for my choice of eyes etc, but I’ve never heard anyone describe it quite like that. Still, that’s better than a ho-hum.
Beautiful! I love the cats so much!
Me too. Thank you!
Amazing work! I find you on youtube.
Can i ask you something? What is that White thing in the end? White paper? White fabric? Looks like pieces of paper.. How is that called? Regards from Slovenia!
Hello Darja. After sculpting with paper mache pieces I add a “skin” of cloth (bed sheets) dipped in white (all purpose) glue. It is light and allows for lots of detail. Regards from the US.
Hello Dan. Thank you very much for quick reply. Maybe I’ll try one day… making a dragon. 🙂 You’re a great artist! I’ll follow you.