
Here are the original posts showing the making of my Sea Dragon. I’m showing these posts from the first to the last and I’m leaving it as one very long page. And I’m sorry for the formatting. I cut and pasted these posts and much of the formatting doesn’t want to change.
First Published 1/23/2011
I’ve decided to make a dragon sitting in a nest along with a baby and a couple of unhatched eggs.
I will start with the nest. I’ve been saving a bunch of driftwood just for a project such as this. So here is the first photo of this project. Thanks for stopping by.

This will turn into a driftwood nest.
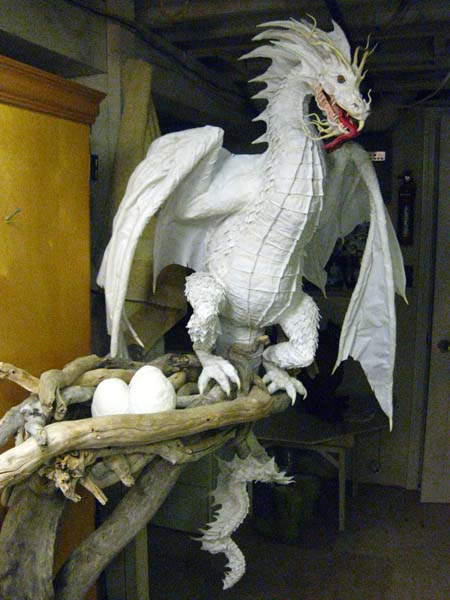
Paper Mache Sea Dragon: The Nest
I’m back. And I’m very happy with the nest I’ve made for this new dragon. The photo doesn’t really do it justice since you can’t see inside. I have this secured to a cabinet for now. It will eventually go on a wall. It’s supposed to look like it’s near the top of a tree. Now I can make the paper mache parts using the nest as a reference. I also know how big to make the eggs. I know that this isn’t paper mache. Just thought some of you might be interested in this step. If you are curious about how I made the nest, look at the photos below. Otherwise, see you next time!


The beginnings of the Dragon

The beginning of a project always involves Max. He loves to tear up paper. As soon as I unfold the paper to crumple, he is in the middle of it grabbing it and ripping it up.

After a bit of wrestling, Max relinquishes the pile of paper and I’m able to crumple some body parts. Here you see a body, a long tail, a neck (upper right hand), two legs (next to Max), two arms (which will be wings), and balls of assorted sizes that will be a head and muscles. As you’ve seen with my art, I like the appendages to be stuffed inside clothes hangers. I did this crumpling over a couple hours one night after school.

I added the paper mache over a couple hours the next night. Here are the balls.

Here are the other appendages. The clothes hangers are great for hanging the pieces to dry. Most paper mache pieces take two or three days to dry completely. I will use that time making claws and teeth.


 I love it when they come out of the oven. Note the brown tinge, perfect for dragon claws and teeth.
Next I’ll make the basic “fingers” for my wings and the toes.


For this I use wire clothes hangers, masking tape, and a phone book. I cut the hangers to size.


I really like the way phone book paper compresses allowing for a tight taper. I twist the paper around the wire and tape. I have some tricks for this kind of thing. It would take too long to explain them here. I have lots of these tricks and hints in my book (shameless plug). I also make two, thin, tapered pieces for the tongue. I add tape to the back and add a few wrinkles.

I “cloth mache” the long fingers for the wings in advance. It makes them very strong. They need to be strong to hold the weight of the large, wet cloth pieces I use for draping the wings.
Paper Mache Sea Dragon- feet, arms, body


Now I’m ready to do a partial assembly of the body. In the photo on the left you’ll see my tail (on the left) and the neck (on the right) and two bodies in the middle. I know what some of you are thinking…why does he have two bodies. Well, it’s because whenever I paper mache the bodies and appendages I make extras. (Surely this is a paper mache trade secret.) That way I use up the paste. And if you’ve read my other entries you’ll notice that many times I cut open paper mache balls and pull out the wads of paper inside. I throw the insides into a corner until I do my next paper mache batch. If you’ve ever looked at my studio (go to my site and check out the 360 degree view) you’ll see a pile of paper mache balls and appendages ready for me to use. So…long story short (well, longer actually) I decided to use the more elongated body instead of the paper mache ball I made for this dragon.
Paper Mache Sea Dragon-assembly!


As you can see, I chose the larger, more elongated paper mache ball for the body. I cut a hole in the bottom and inserted the tail. I continually check the dragon against the nest.


I get an idea for where the right leg will need to be. I cut a hole in the paper mache body. I always try to make the hole slightly smaller than the appendage I insert. Paper mache will give a bit as I push the leg in and the fit will be tight.


This is how the dragon will stand on the nest.

Here is a look from behind.
Paper Mache Sea Dragon: More assembly
I originally thought this tail would hand down lower. So I broke the paper mache and added a few twists. Again, that’s why it’s so great to have wire clothes hanger inside. I just make repairs with masking tape later.


Since I want this dragon to be as light as possible, I pulled out the initial wads of paper inside the paper mache body when I cut the hole for the head. It’s amazing how much paper was crammed inside that body. Max wants to know what’s inside the nest. I fully expect to see him curled up inside the nest at some point.


Next, the dragon needs her wings. I gathered the paper mache arms and the “fingers”. I taped the fingers together into a hand.


I taped the hands to the paper mache arms. Note the extra finger at the elbow. Then I cut holes in the body and inserted the arms.


Paper Mache Sea Dragon- jaws and details


I used hot glue to attach the teeth to the paper mache shells. After that, I wrapped each tooth with a small strip of cloth and glue. Then I put a larger piece of cloth into the middle of each jaw.


I will paint these jaws before putting them on the dragon. I’ll come back to them later.
Time to add a few details to the dragon. Earlier I broke the paper mache leg at the knee. The clothes hanger inside the leg kept it in the shape I wanted. I crumpled up some paper and put it in the hole to make a knee. Note that I also added some “muscles” on the thigh. Those are just smaller paper mache shells like I used for the jaws that I taped on.


Next, a little work on the feet. As you can see, the foot is not too interesting as it is. Now that I’ve bent the toes to conform to the wood in the nest, I want to embellish them. For this I use little balls. Here is one of my trade secrets. I just tear off a few pieces of masking tape and roll them in my palms to make balls of various sizes. The stickiness of the tape holds them together.


I use the smaller balls for knuckles. Just add them and cover with small pieces of masking tape.


I hot glue the claws onto the toes and then wrap them with tape. Next, add the cloth mache around the claws…


…and then cloth mache the legs. In this case I also cloth mached the arms.


By the way, once again I changed my mind about the tail. I wanted it longer. So I made another tapered piece and added it to the end of the tail. I like it much better.
Paper Mache Sea Dragon: Wings
As you can see, I’ve left the paper mache completely behind. I’m solely in the realm of “cloth mache.” One of the coolest things I learned to do with my cloth mache technique is to make wings. If you are interested, read on.

Paper Mache Sea Dragon (back lit)


I dip a large piece of cloth into a bucket of Elmer’s glue and squeeze it out. As you might guess, this is a very messy process. And it can take a full quart of glue depending upon the size of the wings.
Next, I drape the cloth. I push the cloth in between the fingers. You must be patient here. This can be very frustrating. You push in between two of the fingers and it pulls out of adjacent fingers. But you’ll get the hang of it. Don’t get upset.


Note all the extra cloth at the ends of the fingers. Cut this excess off with scissors. Let it dry overnight.
After it is dry, use sharp scissors (I like the little, hair cutting scissors for this) and trim the wings. Beautiful!


In this particular case, I wanted claw (or clawish looking spikes) at the end of the fingers. So I roll back the cloth and use my wire cutters to cut off the ends of the fingers.
I hot glue the spikes onto the ends of the fingers. Then I cover the ends with glue (Elmer’s) and pull the cloth back over the spikes. Look at the photo on the right. How cool are those?


Finally, I turn the project over and lay it on its stomach. It’s hard to see with these photos, but I add long strips of cloth and glue to the back sides of the fingers and arms. This “locks in” the shape of the draping.


I must say one more thing about this cloth mache process with wings. When you paint the wings with latex based paints (basically house paint), they feel like leather. They replicate dragon wings very well.
I love putting breast plates on my dragons. This is easy to do with cloth mache. But first, I didn’t like the body of this dragon. She didn’t really have a waist. This was easily fixed. I just grabbed her in the middle and squeezed. I love paper mache. This is what I mean when I say that it is “forgiving.” You can adjust anything at any point. Then I added tape. I drew a line down the length of the body to guide me as I put on the plates. It’s easy to loose the middle if the neck or tail has a lot of movement.


I started at the tip of the tail. I folded pieces of cloth and laid them on top of one another. I pinched them in the middle to make a crease. This time I decided to have the crease split into three segments when it got to the body.


Now it’s time to add the head. (This part is for you Don.) Putting a head on a project is a matter of putting the jaws together in a position that you like. Tape the back of the jaws to hold the mouth together in that position. Note that I painted the jaws and tongue first…much easier than painting it once it’s on the project.


If this were a simple Screamer or monster, I would cut a hole in the body and push the jaw assembly into the hole and tape. This is a bit different because this dragon has a long neck. I just cut off the neck and pulled out some of the paper. This made a hole for me to insert the back of the jaw. Sometimes there are gaps that need to be filled. I use pieces of paper mache balls to fill those holes. I put the paper mache shell over the hole and added masking tape.


As I’ve said many times, I use smaller paper mache balls for details. I cut off part of one and added it to the top of the dragon’s head. I used my knife to cut a small hole for the eyes which I hot glued in place.


I then crumpled small amounts of paper and wrapped them with tape to add details. In this case I wrapped the eyes to give some depth to the eye sockets. I also use small pieces of paper mache (remnants of the neck in this case) to fashion a nose.

I wanted an elaborate spine on this dragon. It’s a lot of work, but well worth it. Again, no more paper mache. I’m fashioning details with paper (mostly phone book paper) and masking tape.
I twisted paper around pieces of small gauge wire. I tapered them to a point and wrapped with masking tape. You’ve seen me do this a million times. I started at the head and attached the longest spines.


I continued adding the spines down the back….all the way down the tail.


Next, I dipped pieces of cloth into the glue and draped it over the spines from top to bottom. I cut off the excess cloth while it was wet. I know that this looks easy, but it is actually quite challenging.


Paper Mache Sea Dragon: Head and Scales


I continued up the back to the wings and neck. Then I started on the front. First the feet, then the shins, then the thighs.


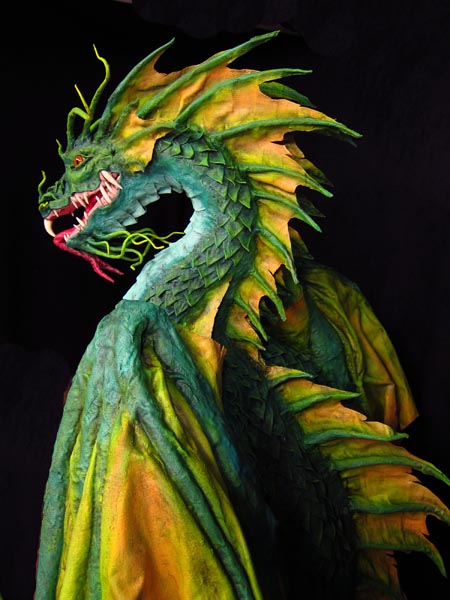
I then worked up the body and up to the head. This particular build I added scales up the neck even though I hadn’t yet sculpted the face. The photo below (on the right) shows the details I added to the face, the tentacles, the nostrils, and obviously the eyes and brows.


Below is a close up of the face after I added the cloth. I know it looks much the same, but look at the lips, the eyelids, and the scales. I’m very pleased with it. It turned out exactly as I envisioned.

Okay, so you haven’t seen Max for a while. This is a funny scene I caught with my camera. I haven’t had the dragon standing on the nest in a while. I worked on the face with the dragon on my table. I didn’t want to drip glue onto my nest. I had just put her back onto the test to get a couple of photos when Max came down to the studio. Lately he’s been jumping in the nest while the mother dragon was gone. He was going to jump up this time and the dragon caught him by surprise.

Yes, I get carried away with my cats. As I mentioned above, I’ve made a baby dragon as well. If you look closely, you can see him.
Paper Mache Sea Dragon: Making the Baby

So, in case you’ve ever wondered, which came first, the baby paper mache dragon or the paper mache egg…
it was the egg.
I used Jonni’s “paper clay” to make the shell of the eggs. That stuff is great. I just made some paper balls and put the paper clay on the outside. I wasn’t sure what size of egg I wanted, so I made a bunch, as you can see.


Once they were dry I sanded them. I didn’t care if they were perfectly smooth. After all, they are dragon eggs. Then I cut one open with my utility knife and pulled out the paper wad.


As you can see below, I just started with a few odds and ends of paper mache balls I had laying around. I didn’t do any kind of formal paper mache on the little dragon. I just sculpted with small pieces of paper mache and masking tape.


I hot glued on some eyes and teeth. I wrapped masking tape around wire to make the “fingers” of the little dragon wings.


I tried to add analogous features to the big dragon, like the spikes down the spine. Of course they would be the baby versions of the mom dragon. I didn’t take any photos of the cloth mache process. Suffice it to say that it took time and patience. Working small is harder than working large in many ways. Many times people will write to me wanting me to make them a “small” dragon. I’ve learned over the years that a request like that really means, “Make me something inexpensive.” The truth is, in many cases, it takes me longer to make something small than it does to make something large. Still, I enjoyed making this little guy.


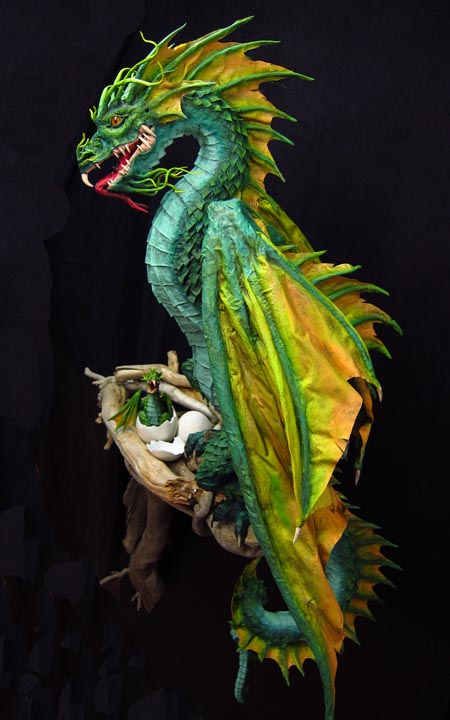

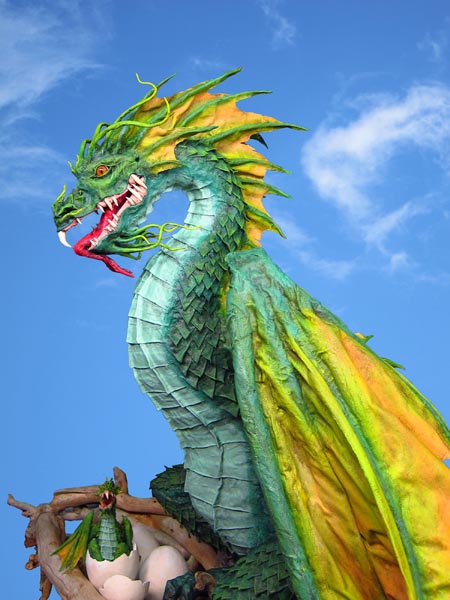
Yes, here is my cheesy Photoshop effort to create her spot by the water.
I hope you enjoyed this build. Take care.
Dan

She is absolutely beautiful I even think she looks wonderful unpainted against the driftwood
Thank you Jan! I’m glad you like her. I do like the projects in the white stage, that one in particular. Thank you for coming to my new blog. I’m working on getting all of my old posts back up.
SUPERBE . EXCELLENT TRAVAIL . QUELLE PATIENCE ….MAIS LE RÉSULTAT EST MAGNIFIQUE . JE SUIS FAN DE DRAGON . MERCI POUR LE PARTAGE .
A – maz – ing. !!!
!!!
I’m sorry to say that I had not heard of you until today. Your talent is mind-boggling, yet step by step, you make it attainable for aspiring artists. I discovered your blog while searching for ideas/help for making dinosaur masks for our summer drama camp. Always on a budget and seeking to find ways that the kids can be involved in every area of production, I decided that paper mache was the best solution for us. Thanks for all the detailed instruction and inspiration! You have me hooked! I will be coming back again and again to read in awe your process and patience! Eager to see your old posts, all 1500 pages of them, from your previous masterpieces! Our kids will be using cloth mache to make a large rock for dinosaur land, paper mache for back pieces for a few dinosaurs to wear, and paper mache for masks for a several friendly dinosaurs. Finding an element for a good, comfortable foundation for the masks is the current dilemma in our planning, but my camp staff-former-art-teacher is pretty amazing, so I’m confident she will find a solution! Meanwhile, thanks again for the “instructable”! Just….WOW!!!
Thank you Bridget! I’m very happy that this may help you. I appreciate you taking the time to write. Good luck to you. Btw, I have a Youtube series of instructional videos for making a mask. It’s in 6 parts. Here is the first if you are interested, http://youtu.be/kt33q82JTmc. I also have a mask-making post from my old blog that I haven’t uploaded here yet. I’ll try to get that done within the next hour or so.
Take care
Dan
Wonderful!! Thank you so very much! Going to the link now and passing on to my camp staff artist. Will check back for older post too! So appreciate the help! Looking forward to more of those older posts…:-)
Simply put: Awesome.
You are very sweet Amber. Thank you.
Awesome is right! How much time do you have in this project? You do have an eye for detail. I love all your work. The colors are beautiful. I am so glad you got you web back up an running.
Thank you Melinda! This is still my favorite dragon for now. It was pretty labor intensive partly because it involved making a baby and the nest. I do like a trophy I just finished. I’m editing the video right now. Should be on Youtube in the next couple of days. Thanks for stopping by!
Dan
Dan,
I bought your book last year because I love your creations and wanted to build a giant spider for Halloween. This year I want to build my own dragon and came back to your site to review the entire process before starting. I know this takes a long time (and large room space), so I don’t want any surprise! Continue your great work!
Good luck Guy. It will be great fun. You just need to start. Let me know if you have questions as you move along.
SHE. IS. FABULOUS!!!!!!!!!!! I CAN’T EVEN CONTAIN TEH INSPIRATION INSIDE OF ME. I AM NOW IN THE PROCESS OF MAKING A PAPIER MACHE DRAGON HEAD TROPHY THING. HEAD OVER TO MY BLOG TO CHECK HER OUT. BTW, I HAVEN’T TAKEN ANY PICS YET… BUT I WILL SOON! the URL to my site is below.
http://mybloooog.weebly.com
I’m very happy to help! Good luck on your trophy and your new blog. I’d love to see the dragon when you finish.
Bravo i love all of your work
Thank you so much!
I am so excited that I found your blog!! I was wondering what kind of cloth you use? I love doing paper mache, and I agree, it’s tedious, boring and seems never ending when your macheing. Watching it come to life during assembly though… that’s where I will work all day and night just to see the finished piece. I couldn’t decide whether to do a werewolf or a dragon for my Halloween set up this year. You have inspired me to do a wicked looking dragon. I cannot wait to get started! So glad I found your blog! 🙂
Hello Shannon. I’m glad to be of help. Sounds like a fun project you have in mind. I use old bed sheets. Nothing fancy. The older the sheet the better. Thrift stores have lots for under $4.
Good luck! I’d love to know how it turns out.
Dan
Hi Dan. Bed sheets from a thrift store were exactly what I plnned on using. Great minds of artists think alike. 🙂 I want to do this correctly and do the dragon justice so along the way I will have a million questions, ( just kidding ), but I definetly will have a few. I hope you won’t mind. On that note….I live on the second floor of an apt. I have a patio that faces out towards the road that enters the apts. Every year I do somthing awesome and elaborate for Halloween because everyone sees my apt when they enter. I also win first place for the contest and get half my rent for free ( always nice). So, I want to make it look like its landing or perched on the railing, but actually not. It needs to be able to be temporarly mounted on something ( sturdy) to give it this effect. It has to be able to be taken down and stored afterwards. Any ideas???? Thank you.
If it were me I’d put it on the railing but have it anchored to something else, maybe from the back. Not sure what advice to give on this.
Also…how do you do the triangular scales???
Start with a square piece of cloth and fold two corners to the middle to make a triangle.
What do you do for eyes make them yourself or buy ready made ones .If you make your own could you show how. PS your the best dragonologist ever .More power to you.Bridget from Tasmania.
Hello Bridget. I mostly use glass taxidermy eyes. I don’t make my own. One time recently I bought some “blanks”, glass eyes that aren’t painted and I painted them myself. If you Google, “glass eyes taxidermy” you’ll find all of the taxidermy companies I use.
Thank you for your kind words.
Wow! Your work is AMAZING! I have bought 2 of your books and watched several of your videos. Can you estimate, from start to finish how many man hours the mother dragon took? Also, do you recommend starting on something like your Fishwichwich, or do you think I could dive right into a dragon. I am kind of a jack of all trades, paint a bit, do simple sculptures with found and cast off objects…made a few pinatas… No mâché expert, just artistic in general.
Hello Barry. Nice to meet you. It’s really hard for me to estimate how many hours I put into a project. I’ve tried. I just loose track. Partly because I’m always doing more than one project at a time. There is drying time between stages. And I’m always trying to shoot video which gets in the way. The Sea Dragon was actually 3 projects, the mother dragon, the baby, and the nest. It took me a couple of months to finish them all. But I’ve been doing this for a very long time. I’m pretty efficient. I think it’s fine to start with a dragon. Many people do. To be honest though, I wouldn’t expect your first result to be everything you want. I always say that the first project is about learning the techniques while the second project will be your masterpiece. But that doesn’t mean you won’t love the first project. I advise most people to make a simple monster first, just so they don’t worry so much about the outcome and can learn the techniques without fear of failure. But you don’t seem like most people. For you…I’d say just go for it. Let me know how it goes. And let me know if you get stuck along the way. I’ll help if I can. Good luck!
Wow!! His work is beautiful , I love dragons and when I saw his work was happy : D Yujuuuu
Thank you Nelly!
I love her! She is beautiful. Brings back memories of my middle school science fair 8 foot dinosaur I made and got a trophy. I did not plan how I was gonna get it to school when I made it.:0) Of course it wasn’t as beautiful as yours but the many weeks I spent on it and the background all alone were so peaceful.Surprisingly, I did not get bored even though I was kid. I know exactly what you meant when you said you lose yourself for hours even though the parts may not be so creative. I could not wait to show my teen daughter who is creative and will love this! Thanks for posting so many pictures! Makes me wanna make something!
Thank you for the note Tracy. I was like that as a kid too. I would do art all day long if given the chance. Sounds like a great science fair project! It must have been a real attention getter! 8 feet tall! I hope your daughter enjoys the work too. Take care
Hey can I buy wanna those??
Hello Nicole. Thank you for the interest in my work. I’m very flattered. I’m sorry but I have many more commission requests than I can handle. I won’t be able to consider any more for quite a while. You might consider using my book to make your own project. http://www.gourmetpapermache.com/PaperMacheBooks.html
Take care
I am so in awe of your amazing and beautiful work! You have truly inspired me!!!! So, of course I ordered your books. Thank you so much for sharing your knowledge with us!!!!! Though I love all of your dragons, I must say this Sea Dragon is my absolute favorite. She is so beautiful! I love her wing style. I would love to make s seated dragon eventually. With her as my inspiration, of course!
I do have a couple of questions for you before I begin attempting to create my Cloth and Paper Mache projects. Where do you get your paper, phone books, and wire hangers? Also where do you purchase your glue and tape? Do you have a favorite style or animal type of eye? (I have been looking online as suggested in your books, wow so many styles and animal types. Do you have a favorite supplier?) What sizes do you make your teeth and claws? What size dragon would you say would be easiest for a beginner? Should I try a trophy or full dragon first?
Ok, sorry, I know that was way more than a couple of questions. But my books just came in, and I purchased my first batch of supplies, except for eyes. I needed to ask you before I ordered those. And one last question about eyes. What size eye would you use for the size dragon you think I should start off with?
Ok, I know you are crazy busy, so I will quit asking questions. Thank you, you are amazing!
Hi Sally. Sounds like you are ready to go! I’ll try to answer your question. First, about eyes. It’s really hard to give advice about that. The eyes are the most personal touch on a project. There is no standard size for a particular piece. Sometimes people prefer larger eyes than I like. But I will use many different sizes. The best way to go about this is to use some card stock or any kind of thick paper and draw circles in various sizes. Try 20mm or 24mm just to start. Add some pupils and then tape them onto your project. See how it looks. Then order the size you think looks best for your project. I really don’t have any favorite company. I use them all. They all offer slightly different versions of these eyes. I guess I like “cat” eyes because of the slits. But I don’t always use those for dragons. I get my masking tape and paint from Home Depot or Lowe’s. I buy “contractor” packs of 5 or 10 rolls. I get Elmer’s glue from Lowe’s. I like phone book paper for some things but it’s not absolutely necessary. Newspaper will work. Hangers you can get at thrift stores, dry cleaners, or online. again, there are no standard sized teeth and claws. For your first project just be loose about it. Just make the parts about the size you see in the photos. Make a monster or a dragon. You just have to choose a project and start. Just let it unfold. It will work out fine. You will see. Have fun.
Thank you for this. She is Awesomness on a nest! keeps me going with my much smaller projects. One day i’ll do a dragon but as they are such magical creatures i want to make sure I have the skill to do it right. 😀
On the other hand, since dragons are mythical, you can make it any way you want.
Good Sir,
You may be the coolest artist I have ever seen. You inspire me to create legendary works of art like your own. Keep up the immaculate work!
Sincerely,
A Dragon Fan
Thank you dragon fan Bear! I appreciate the note! Good luck to you! Make something legendary!
Hi Dan,
I have a couple more questions for you. I decided to go ahead and try to make a seated dragon for me first project. So far I have several size balls for heads and bodies, I kept making huge bodies, then having to cut them down. Lol But since you said we need lots of extra balls, I figure I will eventually use them all up.
Anyway, my question, what was the length of the wires you cut for wings, tongue, feet, spines etc. for this dragon? And how many did you use of each?
Thank you so much!! I have been sharing your videos on my Facebook page to show my friends who my “teacher” is. And asking them for phone books, hangers, sheets, etc. I am so excited, thank you so much for sharing your knowledge!
Hi Sally. I think the “fingers” on the wings were about 24 inches long. The tongue was about a foot. Spines a few inches. But there is not perfect length. Just experiment a little until you get the size you like. Have fun!
Wow what can I say Sir? Your work is fantastic I am just going on Amazon to buy your books,I’ve watched all your YouTube videos, I am not very arty at all but I will try a my best and show you some photos of the finished project,I love the cats also…
Thanks Anthony. Good luck! I’d love to see photos when you are done. And I’ll share what you said with the cats.
I love the trophy mounts of the dragons. What kind of lights did you use inside the mouth to light them up? I bought two of your books and have my first dragon well under way. Getting ready to drape the wings. Thank you for sharing your art.
Hello Sharon. Thank you for the remarks. I do appreciate them. For the two projects I used lights, I used small leds. I got them here http://www.lights.com/vivid-series-battery-string-lights-p-36620.html Good luck!
You need mental help. Great artwork though.
You are to funny! I would be careful who I say needs help when you go by the name of “god” and and email of god@god.god! But glad you like the work. Take care
Hi Dan, I’ve been making teeth for a paper mache dragon trophy that I’ve been working on (the teeth are white) and some of the teeth turned a peach-orange color. Do you know why this happened? If not it’s ok but I was wondering if you’ve ever had this problem or knew why it happens.
This kind of thing happens to me all the time with polymer clay. They all change color a bit when baked depending upon the length of time in the oven and the temperature. Of course and the color you start with, and the brand of clay you used. Sometimes I really like the results, sometimes not. I loved how it turned out on the trophy that I just donated to the foundation. The burnt look was perfect. But I haven’t been able to replicate that. My guess is that you left them in the oven a little too long. You can always add a little paint when you are done. You can get some great results by using washes (watered down paint) on those teeth.
Good luck!
Thanks, I guess for future projects I’ll bake all the teeth at the same time. Hope that the fundraiser turns out great!
Yes, that’s not a bad idea. Although you’d be surprised how cool the effect of mixing different shades of teeth in the same mouth.
Thanks. I’m hoping people will support the cause.
Good luck!
Good Evening
what a lovely dragon that you have created. Simply mind blowing how it all came together. i am going to do an art project and I immediately thought of a dragon but from the East hence google searched and came across an image of your book. any pointers you can give on how to start using a balloon as the body structure? thank you
Hello June. Sorry, I just don’t use balloons. Too symmetrical. Just don’t like the shape. Paper wads are a much better way to go.
These are amazing. Such an inspiration. I plan to make monster hunter dragon heads for my friends (monster hunter is a video game we all play together). do you think that the same paper mache ideas can be applied to armor as well?
Hi Shyann. Glad you found this useful. Do you mean armor like humans use? Or armor on a dragon? Sorry, not familiar with this dragon. But regardless, I think these techniques work well for any kind of sculpture you want to make.
Good luck!
This is just so amazing and awesome… That’s the only way I can put it, I’m gob smacked! Just love it!!!
Thanks Cherry. “Gob smacked”, what a funny saying! This just reminds me that I have to get a new post on here.
Your work is gorgeous! I just ran across your work today on Facebook. You both encourage me to do something similar and intimidate me because I don’t think I could make anything as beautiful. But, hey, I could try and post my art beside yours and put “nailed it!” like those funny Pinterest posts when the person obviously did not nail it. Haha.
Thank you for sharing your incredible art.
Most sincerely,
Nina Phaup
Hi Nina. I’m glad you like my work. Like anything else, it’s all about practice. I always say that your first project is about learning the techniques. Your second project will be your masterpiece. That has proven true over and over. And that doesn’t mean that the first project isn’t great. You will love it. Just give it a try. You’ll be happy you did. Thanks for stopping by.
Your work is gorgeous ! I can’t believe people don’t see how much work you put into them. They’re worth thousands of dollars.
Thank you Nina. I appreciate the nice note!
His work is fantastic , congratulations. I’m thinking of trying to make a dragon, however I have some questions , such as what material used to make the scales of the dragon? It seemed like cloth , and if it is what kind of cloth was used ? I thank you and once again congratulations for the great job.
Hello Julio. Yes, you are right. I add a “skin” of cloth (old bed sheets) dipped in white glue (all purpose). It is light and strong and allows for great detail. Good luck!
Impecável, perfeito……eu faço algumas esculturas em papel mache, mas nada comparável a essa perfeição; me inspirou muito, principalmente a técnica da pele, fica muito natural. parabéns.
Muito obrigado para a nota Jessica! Estou muito lisonjeado. Boa sorte com sua arte
Hello! I really enjoy looking through your projects. You’re a pro.
I’m making a dragon for a kids camp that curls around my neck. I’ve just draped one of the wings with cloth maché. I’m really enjoying making it.
One question, though. Do you use Elmer’s glue for all the cloth maché? I can’t find out what you use.
Thanks,
-Daniel
P.S. You have a really awesome name. Probably the best in the world!
Hello Daniel. Thanks for the nice note! Your dragon sounds great! If you are interested I’d be happy to post a photo on my site when you are finished. Just a thought. I use Elmer’s for my cloth mache. But I have used other brands too.
PS. The problem with having a name like “Dan” is that it rhymes with “man”. Hence a life of Dan the (whatever) man”. Or even just “Dan the man.” Of course I go by Dan the Monster Man in the Pacific Northwest because that’s what I was called in a newspaper article in 1980. So yes, our name is great…. sort of.
Take care
That’d be awesome. I’m sort of putting the process up on my blog.
Thanks for that. I wasn’t quite sure what glue you used for the little pieces of cloth. But now I can start the scales. I’m going to do a splitting breastplate like the dragon in this tutorial/buildalong.
P.S. Yes, I agree with you there. I’m called ‘Dan the Man’ a lot by my grandmother and youngest siblings.
-Daniel
https://danielsampson1122.wordpress.com
Nice blog! Your dragon is coming along well! Have fun with the next parts.
Jesus christ this is just pure awesomeness. I started doing paper mache the same day as i discovered you youtube channel, wich was 3 days ago! Can’t belive i haven’t discovered you until now. Have you ever thought about making a turtle? I think you’d do amazing.
Hey Ruthless. You are funny! I haven’t made a turtle, but you sure should, to match your name. Nice to meet you. Good luck to you with your work!
Definitely gonna try making a turtle! Thank you!
Definitely! Particularly with your login, you need one! Have fun!
I am a huuuge fan of your work! This sculpture is one of my favorites. After much anticipation on what to get my boyfriend for christmas, my sister suggested I make him one of the dragon trophies! Do you think 2 weeks is enough time to construct one?
Hello Da Reen. Wow, two weeks would be pushing it. There is drying time to consider between steps. I won’t say that it can’t be done. But it won’t be easy to meet that deadline. Maybe you show him the work in progress if you don’t finish with the promise to finish it soon. Just a thought. Good luck!
So lovely!!
Thank you Queen Mesha!
You sir, have inspired me to the utmost level. Your pieces are beyond stunning and creative. My resolution this year..to be as great as the master.
You are very kind Dave. I really appreciate the remarks. I’m no master. I just enjoy making the art.
Hi Dan,
I have been following your work since “Simple Screamers”, many years ago, and have made countless monsters, dragons, fish, etc. Just wanted to say “Thanks” for the inspiration.
I have one issue that is difficult for me, and that is retaining the shape of wings or other draped parts when painting. I use latex housepaint, and it seems to get to heavy especially when mixing colors. Any suggestions?
Hey Deb. Simple Screamer….that’s a while back! I always just expect that shapes will change as I move along. For the most part, if I can, I’ll turn the piece back to the original draping position once I add the paint so that it dries in the same position. But paint is heavy so it will change once in a while. Good luck!
Beautiful ,Awesome I want one
Thank you Dahlia. I appreciate the note.
Amazing dan. Delitful. Onspirational. Thank you for sharing you pictures of time and patience to create such ambient creatures.
Thank you for the nice note Tilsa! You are very welcome. Glad you enjoy the work.
That’s awesome dude I’m a collector of dragon’s that is truly awesome.
Glad you like this. Thanks Ernest.
Thank you for your attention to detail. I’m inspired by this art form and have a 7 foot project all over my living room right now. While I am not as advanced as you, I have learned and you have set a high bar !
Thank you for your inspiration!
Hello Timothy. You are very welcome! And yes, you set the bar high, a very good trait for an artist. Have fun with that. I’d love to see it when it’s finished.
Ola como compro seu livro Paper Mache Dragons
Você pode comprar meus livros do meu site, https://gourmetpapermache.com/about-my-books/.
This is fantastic! Your work is inspiring me for a Halloween costume I’ll be trying to make (it’s currently all in my head). I will be heavily pregnant by then and thought it would be nice to be something other than the standard pumpkin, or basketball, as I’ve seen other pregnant Halloween costumes be. I want to be a seahorse, with a steampunk flare. Trying to figure out how to make the spines similar to a seahorse, and your work has definitely helped! Thank you!
Glad to help Jessy! Good luck to you!
I want to make one (at least) of these. I’ve been reading this for the last hour or so. Can’t wait to show my grandchildren. Great descriptions and photos of your procress. Thanks for all the great ideas
You are very welcome! Good luck Nannette!
Absolutely amazing… I did something similar with bronze a while back but I think I’d prefer it in paper! Much more affordable and portable! Lol what is the “cloth” you keep mentioning??
Glad you like this Holly. After sculpting with paper mache pieces I add a skin of cloth (old bed sheets) dipped in white glue. I call the process “cloth mache”. It adds strength and allows for details hard to get with paper alone. Good luck!
You are a truly inspiring artist!! I’m a highschool art student looking into making a paper mache mask! I know you have done the “bank teller” mask on your YouTube but I was just wondering if u have ever done a paper mache dragon mask? If you have could you maybe link me it if you haven’t yet it would be a great future project maybe? love the sea dragon idea by the way!! =D
Hello Chloe. Sorry, I’ve only done the mask series you mentioned. But the process would be the same for any kind of mask. Just the details would be different.
This is wonderful and I have your book to inspire and instruct, too. Time for me to have a go. A publisher has asked me to illustrate a book cover with a dragon. Hmmm. Painted, cut paper or…
Have fun Peter! Thanks for the note!
Amazing work. Love the cats.
Thanks for all the tips.
You are very welcome Ben! Thanks for the note!
Hello Monster Man! Long time lurker, first time poster. (: I’m finally getting around to begin some fun art projects now that spring semester is over but I’ll likely be limited to water-based paints. I do have a couple gallons of liquid latex on hand so what to you think about coating the linen wings, inner mouth and such with liquid latex and painting over it with acrylics? Similar effect?
Hello Mellifluouslies. I’ve never worked with liquid latex, so I just don’t know how it would behave. Latex is just rubber, so it seems like that would be great for wings. You might have to experiment with it to see how it works. Sorry. Wish I could be more help. Let me know how it goes.
Hello! I am planning on trying to make a horse at some point and want to know what kind of recipes you use. I’ve seen you mention glue and flour based but would like the know for sure!
Hello Kalli. I usually use white flour and water paste in a ratio of about one to one. That’s not exact. You need to add more water as it thickens, which it will as you use it. You can also just use white glue instead of flour and water if you’d rather. I prefer the flour and water paste. Good luck!
Amazing!!!
Thank you!
bonsoir j adore se que vous faite je suis fan de dragon et je trouve celle si fantastique j aimerais moi méme faire un dragon et j aurais voulu savoir quelle taille un peut prêt fait votre dragonne merci
Je suis désolé mais j’utilise google traducteur. Je ne comprends pas votre dernière phrase.
bonsoir j aurais voulu savoir combien mesure votre dragon des mers il et juste magnifique
merci
Bonjour. Je suis très heureux que vous aimez ce projet. C’est un projet que j’ai passé trop de temps à mettre un prix. C’est en fait trois projets, le dragon, le bébé et le nid. Mais merci de votre intérêt.
What the size of your sea dragon ? can you respond in english please ?
Just the mother dragon is about 46 inches tall, 18 inches wide, and about 24 inches deep.
AMAZING WORK!!!
I love your work and was wondering if you have a book. My son loves Dragon’s and I would love to surprise him by making him one. I am a artist I draw and paint so he has lot’s of pictures I have done for him. But this would be extra special.
Hello Brenda. Yes, I do have a couple of books. The dragon making book is the one you would want. You can get it on my site, https://gourmetpapermache.com/about-my-books/, or on Amazon. Good luck!
That is the most wonderfull Dragon in the world! I can not wait to try and make one myself. For you to show the building of this Dragon is so remakable that I do not have all the words to tell you how great you are for sharing. Thank you so much,Tess
Do you have any books that you have done yourself to be purchased? Thank you again, I can not keep all my ideas on a shelf any longer, so I must finish writting things down and be on my way to building my own Dragon!
Thank you for the nice remarks Teresa! I’m happy that my work has inspired you to start with this medium! Good luck and have fun! PS. I do have some books on the subject. You can find them on my site, here, https://gourmetpapermache.com/about-my-books/, or on Amazon.
bonjour je vais avoir terminer mon projet et j aurais voulue savoir quelle étais le produit noire que vous mettais a la fin et que vous essuyer merci beaucoup
Bonjour. C’est juste de la peinture noire avec de l’eau ajoutée. Bonne chance!
bonjour merci beaucoup
I love your work. O purchased your ftagpn book. And made my own. Will post a picture.
I’m very happy you found the book useful Liz! I’d be happy to post a photo of your project on my website if you are interested. Just send photos to dan@gourmetpapermache.com.
Thank you for sharing. Just new to this art.
Saralan
You are very welcome Saralan! Have fun!
I never, and I mean NEVER take time to read how anything is created on Pinterest from beginning to end, but this caught my eye and I couldn’t stop!! Blown Away! I wish I could do this! Your work is amazing
Hello Audrey. Well what a nice note! Made my day! I don’t often do those kind of tutorials anymore. Just don’t have the time it seems. But I’m very flattered to have someone like you appreciate the effort. Makes me think I should do more. Thank you so much!
Dan
Fantastic job I’m amazed
Fantastic job I’m amazed, to see how far paper mache has come in 40 plus years blows my mind thank you for the inspiration to have a go at something this magical
Thank you very much for the nice comment Jan! I’m very happy that you enjoy the work. Actually, I have been trying to encourage people to give this medium a try for over 4 decades. It’s always very gratifying to hear that someone has heard the call! Good luck and have fun!
Que coisa mais fantástica!
Parabéns!!!
Você é muito gentil. Obrigado pelo comentário agradável!
gostei, ficou bacana
Muito obrigado!
Thank you for sharing your work. I really enjoyed seeing all you showed.very inspiring. Thank you what a wonderful artist you are.
You are very kind Emily! Thank you for the nice note!
Absolutely amazing – love this piece of art!
Thank you very much Leslie! That is nice of you to say. It was one of my favorite pieces to make.
Love this. Do you sell or take requests?
Hi again Jay. You must not have seen my reply to your last post. The short of it is that I have done many commissions over the years but am currently not taking any. The only things I have for sale is listed on my “art for sale” page.
This is some of the most incredible artwork I’ve ever seen! Absolutely amazing!!!
Thank you for the very nice comment Mary Lou! You are very kind.
That is truly amazing. I am so inspired by what you have made with paper mache. I love dragons they are a part of me.
Thank you for the nice remarks Tracey! I’m very flattered especially since you are a real dragon fan. Take care
Dan
Que artista maravilloso felicitaciones
Eres muy amable. ¡Gracias por tomarse el tiempo de escribirnos!
C’est splendide j’ai aimé votre travail et vos notes tout au long de ce projet ce qui m’a donné l’impression d’être à vos côtés. Vous devez être un bon professeur.
Félicitations pour ce magnifique travail de patience vous resterez dans mon esprit.
Sylviane
Merci beaucoup Sylviane. Vous êtes très gentil. Je suis flatté. Tu as fait ma journée ! Bonne année à toi.
Dan
Absolutely stunning!!!! I’m amazed and inspired ✨️ 🙌
Thank you very much Robin! I’m very flattered.