
I asked Eddie what I should make. He thought about it for a while. You can see him thinking. What he told me was that he wanted food. I explained to him that I already gave him some food and just because he didn’t like it I wasn’t about to open a second can. At least not for an hour or so. He got a bit annoyed. Anyway, he decided I should make a dragon for the Year of the Dragon. Great idea Eddie! (Okay, so that’s not really true. This dragon is being made as a commission. While I love the idea of making a dragon during the Chinese “Year of the Dragon”, privately I refer to this as “Pascal’s” dragon.)

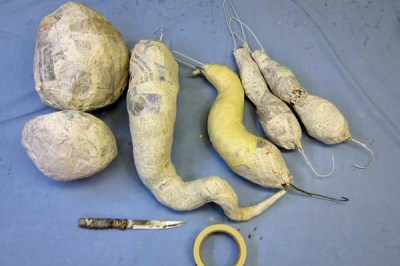
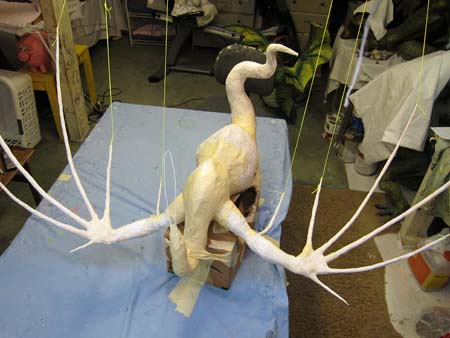
Starting on the left I have two parts for the body, a tail, a neck and two legs.
I cut a hole in the largest of the paper mache balls and inserted the tail.
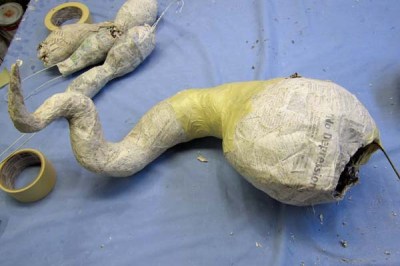
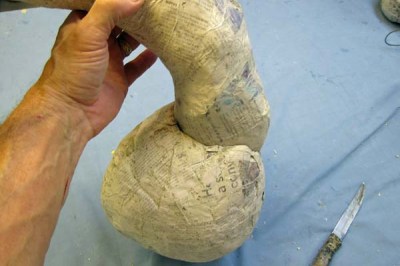
I put the pieces together with masking tape.


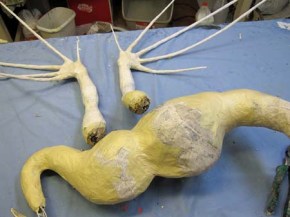
I tape the fingers around a crumpled wad of paper to make a hand. Then I taped the hands onto the paper mache arms I made earlier.

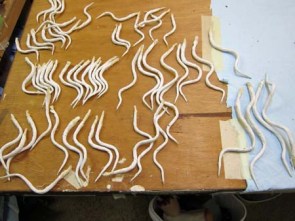
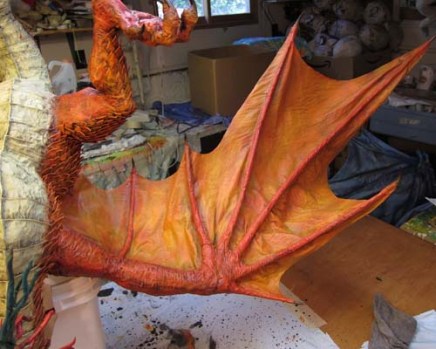
These wings are fairly large. When I drape the cloth dipped in glue over the fingers they will be quite heavy. So I attached string to the ends of the fingers and securde them to the ceiling of my studio. Otherwise the fingers would just bend down and it would be a mess. This is not a problem with smaller wings.Below you can see the wings after the cloth dried and I trimmed them with scissors. I’m quite happy with how they turned out. When I paint these with latex paint they will feel like leather. The rubber/cloth mache combination is perfect for wings.
 Before I leave you, let me show you the making of the jaws. I know this is getting a bit old for you experts out there. But maybe there is a newbie paper mache artist visiting who has spent sleepless nights wondering about dragon jaws. I always start with one of the smaller paper mache balls. I cut it open and pull out the wad of paper leaving two half shells. I used Fimo again for the teeth (and claws and horns). I hot glued the teeth to the shells.
 Then I cloth mached around the teeth and inside the jaws. On the right you can see the finished jaws. I decided to paint these green. I made a pretty cool tongue for this dragon. I usually make a bifurcated tongue, like a snake for dragons. But I wanted this to be special. I split the tongue into four parts at the end. It’s a bit hard to see. But I think it adds a lot to this dragon.


 You can see how much difference a bit of detail can make. A few knuckles, ankles, and claws and they take on a completely different character.
 I wanted one foot to be open and the other more clenched. I prefer asymmetry wherever possible. On the right you can see what one foot looked like after the cloth mache.
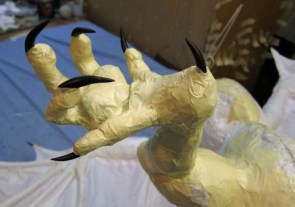
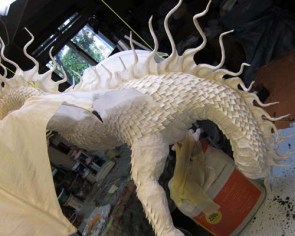
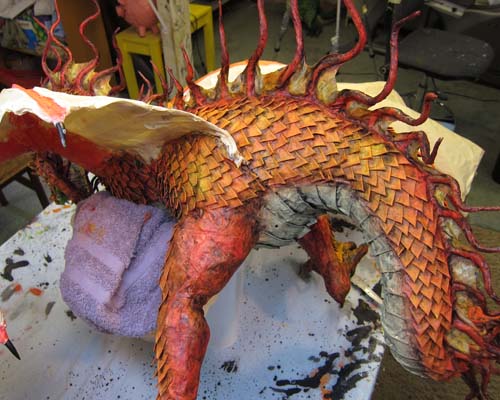
 I added my usual breastplates. I started at the tail and worked my way up to the neck. I decided to do this before adding the head (for no particular reason).
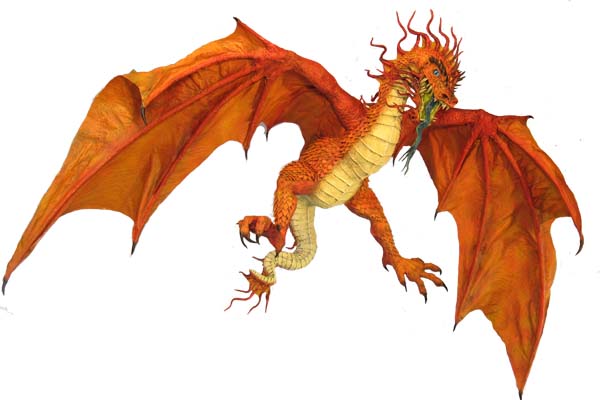
 I added the jaws to the neck. I wanted the dragon to be floating, much like an eagle, scanning the horizon.
 As usual, Eddie was helping me out. He decided to nudge the wing a few times, just enough to get the dragon rocking.


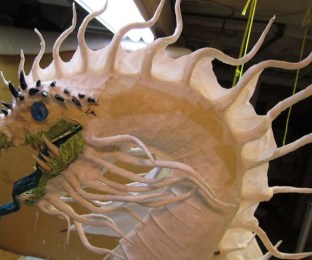
As you can see on the left I added some little Fimo horns. I also made some cool eyes for this dragon. Well I re-made some eyes. I took some glass taxidermy eyes and used a Drummel grinder to grind off the paint except for the lens. Then I used white and shades of blue paint and swirled them together around the cat shaped lens. They turned out very well. It’s hard to see in these photos. I’ll try to show a close-up of these eyes later on. Then I added some tentacles to the chin. On the right you’ll notice the spines starting at the nose….

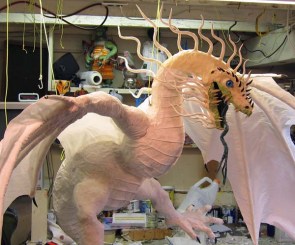
…and moving down the back and tail. Later I added some cloth webbing in between the spines.

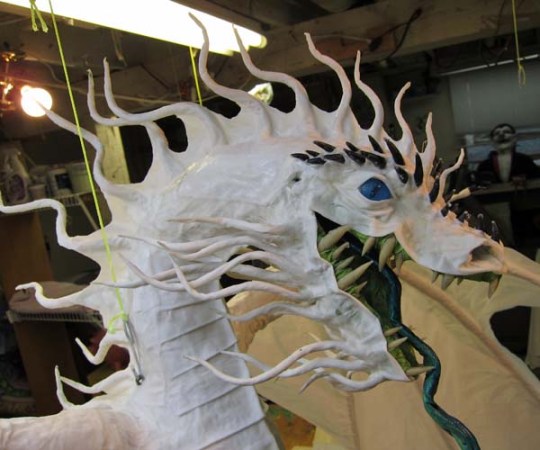
I decided later that I wanted more Fimo spikes so I added a second layer above the eyes. Then I added the usual details with cloth mache, the lips, eyelids, etc.. I think the face has a nice fierce look to it. I’m pleased.

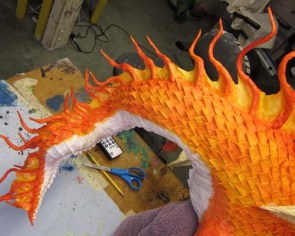
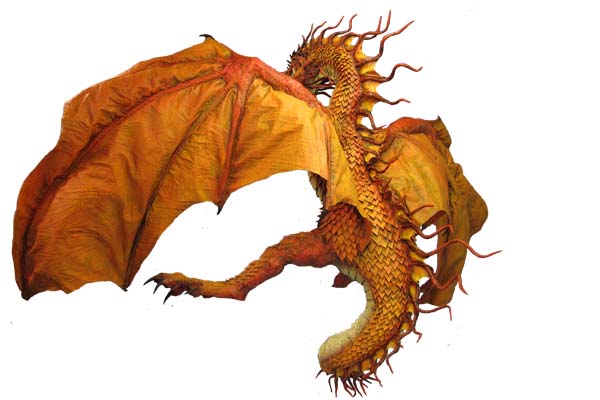
I keep going up the neck and onto the face. Time to paint. I wanted a very bright yellow-orange color for this dragon. I guess this is my favorite color scheme for dragons.

The camera never really captures the true colors here. I painted the breast plates a light, almost pastel yellow. I did something a little different on the wings. I painted a pattern on the them. I eventually paint over it, but the pattern still shows through a little when I’m finished. It’s kind of a cool effect.


Below is the finished wing. If you look carefully you can still see the pattern underneath. Trust me, it looks great in person.
About blackwashing…So many people just refuse to do it. I can understand. You paint a project and it looks beautiful. The notion of painting it black just goes against the grain. It feels like you are going to wreck a beautiful paint job. But I’m always happy when I’m finished. It does indeed change the character of the piece. Still, in my opinion, the blackwashing makes the project come alive. It pulls out the color and really accentuates the detail. Check out the difference between this photo and the one earlier. Then you decide if it was worth it.
Here is the face after blackwashing. I really like the way it came out.

Here he is. One of the nice things about this dragon is his posture. You can hang him almost vertically and he looks like he’s ready to scratch your eyes out.
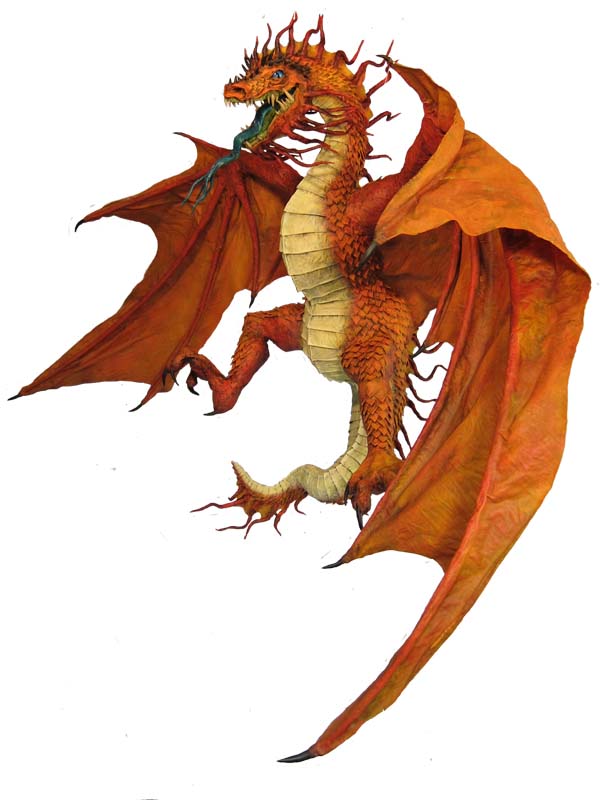
Hang him like this and he looks like he is surveying the area below.
From the back.

I’m in the process of making a paper mâché dragon, but I can’t seem to wrap the fingers correctly. They are always too loose. Any tips on how to wrap them in paper?
Hello Gumpmeister. It’s very difficult to describe. I twist the paper around the wire in the direction of throttling a motorcycle. I add tension when I add the tape. I put the roll between my legs. I pull the tape out and attach it to the end of the finger. Then I turn the finger in the same direction while pulling on the tape outwardly so that the tape is taught. I think I show this somewhere in one of my videos. Sorry. Don’t know how to do better than that. Good luck!
Thanks that helps a lot, and keep making amazing pieces of art
You are welcome. Have fun with your dragon!
Man o man you do some cool stuff.
Thank you!
Thank you wedeclare. I appreciate the thought.
Hi I would like to ask is it scotch masking tape u use?
Yes. And Scotch is now the same as 3M. You can get “contractor” packs of 5 at Home Depot. Just don’t get the colored versions, blue or green. They don’t stick. Just beige.
How long did this take you? It is a massive design. And the Blackwash… perfect! I LOVE THAT TECHNIQUE!! You are very talented. I discovered you this evening after a shared facebook post, then went crazy. YouTube channel, your website, blogs. Much Talent. Such treat. I might even try to do something myself now…. well pet eddie for me. Ta ta!
Thank you for the nice remarks Shelby! I’m very glad you found this to your liking. Good luck to you with your projects!
Hi Dan, I just found your site a few days ago and was totally blown away with your work! I have been doing paper mache on and off for the last two years. I did a giant puppet parade and love making large creatures. I’m researching doing a dragon, for a dragon boat team of women. They want something they can parade around at meets before their race. I’m thinking a seadragon? They need something small enough to carry in their car. So I’m thinking make a great head and make the body out of collapsable material. Any ideas would be so much appreciated. I ordered both of your books, hoping to gain a little more insight into how you do it!
Hello Susie. Sounds like you have a big job ahead. I don’t have a lot of pointers since I’ve never made something like that. I guess I would prefer to make something that comes apart rather than something articulated. So make a body with holes to insert the appendages, neck, arms, legs, wings, etc. If it’s big you’ll need to have some engineering. Maybe double up on clothes hangers or use PCV pipe. Then just use the same techniques I use on each part. Don’t know what else to add. Good luck! Hope you have some fun.
that is really amazing can you put a video on how to make a paper mache dragon
Thank you Brandon! Glad you like them.
Hi 🙂 I really find your work amazing so I decided to have a go myself for my GCSE art sculpture. Im nearly done but I’m having a little trouble with the scales. I have cut up triangles but when I try to stick them on like you do they look nothing like scales, just odd triangles on the dragon. Do you have any tips? Also how do you mount some of your dragons to the wall? Mine is meant to be wall mounted but I’m a little stuck on how… Thanks and keep doing your amazing artwork! 🙂
Hello Lada. I don’t cut triangles. I fold square pieces of cloth into triangles. That way they are thicker. Most of my wall mounts just hang on a screw. I put a screw in the wall at an angle. I put a hole in the back of the dragon and slide it over the screw. You must reinforce that area around the hole to make it strong enough to hole the weight. Use extra cloth and glue. Good luck!
Hi Dan, your paper Mache zombie dragon has some interestingly colored teeth, I was wondering how you got that color.
Hey there Grumpmeister. The teeth were kind of an accident. I just forgot about them and left them in the oven way too long. So the coloration is because they were burnt a little at the ends. I’ve tried to replicate the process (because I really like them too) but have never gotten them to be exactly like the ones in this project.
Thanks!
Hi dear friend and firstvof all congrats.
Its impossible to reproduce this one by my own. If I ask you to make one of this one for me, how much are going to charge me?
OBS Im brazilian.
Hello Celio. I am sorry to say but the shipping costs to Brazil would make any commission too expensive. It can cost between $1500-$2000 for shipping only. That would double the price of the piece. Sorry about that.
Hello from DuPont, WA. Awesome stuff you do! I am currently working on my first dragon and am curious about two things. First, with Sculpy, it does not seem to be hard, like sandable hard, after being baked. Is this the way it is, or am I doing something wrong? Secondly, prior to applying your black wash, do you first seal the base color paint with a clear gloss of some sort? Looking forward to seeing more of your work!
Hello from Seattle Peruzer. Polymer clay does not get sandable hard. Well, it will if you bake it too long. But then it becomes really brittle. The flexibility is part of its strength. You are doing it right. I don’t seal with anything. I blackwash after I do the base painting. Thanks for the note. Good luck on your dragon!
hello love the work im an artist also in all kinds of media what do you use for the webbing of the wings
Hello Doug. Those are bed sheets. Nothing special.
Hello,I am trying to make a paper mache dragon. I was wondering when you put the scales on is it just glue or is there another ingredient I need to add to the glue? There is also different looking scales that look like stone, How do you make those as well? We bought your book as well and it has been very helpful just need help on these questions. I absolutely love your work that is why I am trying to make one. Keep up the great work! Thanks
Hello Philip. I just use the white glue with the scales. No other ingredient. The “spitted” scales I use Celluclay mixed with white glue and sometimes a little toilet paper mixed in.
Good luck with your dragon!
Thank you so much, very helpful! Would you like to see the dragon once I am done?
You are welcome. Yes, I’d love to see the finished piece. I’ll post a photo on my site if you are interested. Have fun!
Hi Dan, I was wondering when you get the glue off of the horns and claws, do you just scrape off the glue with a knife, or are there other steps?
Hey Grumpmeister. Always nice to hear from you! I brush on some warm water before attempting to get the paint off, particularly if it’s been sitting for a while getting hard. (It is much easier if you do it soon after the basic painting when the paint is not cured.) Then I use a dull knife or even a rough moistened wash cloth.
Hope all is well.
Thanks! Also I was scrolling down the main blog page and noticed that the Drogon trophy that you made, was created almost a year ago! Time flies, keep up the great work!
Time does fly Grumpmeister. I couldn’t agree more. I feel like I’m in a race to make as much art as I can before I die. Not sure why. Which reminds me that I need to put a post out there. I’ve been busy but neglectful of my blog. Thanks for reminding me.
How do you do the scales?
My scales are just folded pieces of cloth into triangles (usually).
Hello I’m so inspired by your work! I LOVE to make sculptures and adore dragons too! What paints do you use? I’m guessing acrylics but I’m unsure and is it the same pain type you use to blackwash? Thanks !
Thank you Lily. Most paints are now acrylic based. I use all purpose paint that I buy at Home Depot. Any water based paint will work. And the blackish is just black paint with water added. Good luck with your art!
Ive been making 1/4 scale models from thick post board using superglue,.I wanted to try my hand at this. All I can say is WOW do I have my work cut out for me. Looks very time consuming but well worth it. Bravo sir. Keep us posted.
Hello David. Yes, this medium is fairly time intensive. But I like the work so I don’t mind. Thank you and good luck!
AMAZING WORK!
I did a huge mask that fit over my head and sat on my shoulders.i looked out through his mouth. He was one of the hecklers from the balcony of the Muppets. Your work is incredible!!! Question, the coat hangers in the dragons limbs, did you use them to get the realistic gestures and then remove??
That sounds like a great project Belinda! What fun! I use clothes hangers to insert a wad of paper for the upper part of an arm or leg and then add another wad for the bottom part. Later, when I am sculpting I can bend the limbs and they will stay put because of the clothes hanger inside. I do not remove them. Good luck on future works!
can u demonstrate how to make the scales and breast plate please?
Sorry, just now seeing your question. If you look at the posts on this blog you will find several that show the breasplates being added. But they are just long pieces of cloth dipped in glue and folded in half lengthwise then layered over the body of the dragon from the tail to the neck. I make many kinds of scales but the easiest are just square pieces of cloth dipped in glue with two corners folded to each other to make a triangle. That is all they are.