
This is going to be a very ambitious project. I wan to make two dragons entwined. I’ve wanted to do a project like this for a long time. It will be a real challenge. Perfect.
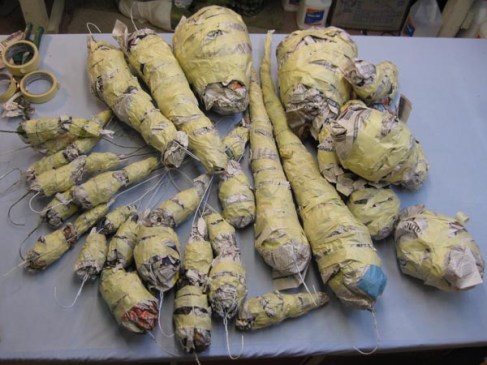
First, the crumpling. Since I’m making two dragons I crumpled two bodies, two heads, two tails, two necks, four back legs, four arms, four more wing arms (I haven’t decided whether to make these dragons with just a set of wings for the arms, or whether to have arms along with wing arms. Did that make sense?) I also crumpled a lot of smaller balls of various sizes to cut up for details. Total work time so far, 2 hours.


Paper Mache “Double Dragon”: Fingers, Toes, Wings
As you can see, much of this work is just plain work, hard work in fact. What you see below represents another 2 and a half hours of tightly twisting paper onto pieces of clothes hanger. Unless you have arms like Popeye, this is a severe forearm workout. What you see: (top left) 4 half tongues (will put two together for one tongue leaving a fork at the end), and the long, tapered “fingers” of the wings for both dragons. (middle) 4 toes on each foot for both dragons, and (bottom left) four fingers for each hand for both dragons.


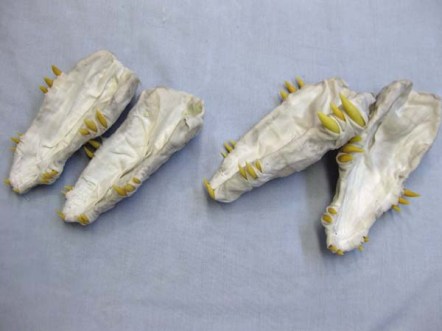
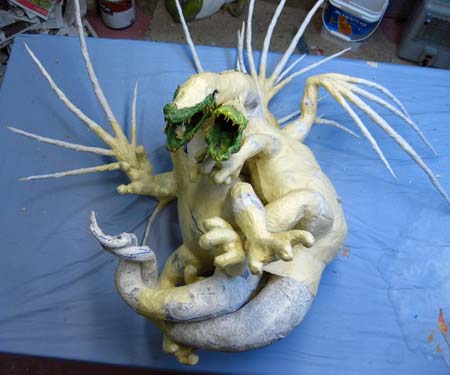
I hot glued the teeth to the paper mache shells and I made two tongues. Then I added the cloth mache to the jaws.

 I added the necks, and then the jaws.

At this point I want to let everyone know that these two dragons will not be mating (just in case your kids are looking over your shoulder. They are “spooning”, a kind of hugging that moms and dads do)(every so often)(when it’s cold outside).
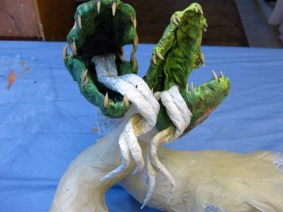
I used Fimo to make some horns that I plan to use on the head later on. Black for him, white for her. On the right, I wanted to see how their tongues would “relate” to each other. I like this parallel look.


I added the legs …then the arms.

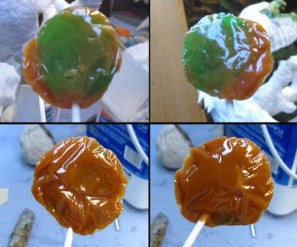
I put together the rough feet and hands. You may have noticed that I quit posting how long it is taking me for each session. At the beginning of this build I swore I would keep track. But I can’t hold an idea for that long, so I’ve since completely abandoned that idea. But I’ve found something better to mark the time spent on this pair. I’ve picked up another bad habit recently. I’ve rediscovered these caramel apple suckers, you know the ones with caramel on the outside and apple sucker on the inside. Amazing. One of the fun things about these suckers is the surprise when you first unwrap them, seeing the ratio between the caramel and the apple sucker. Note the first row of the photo. That sucker is a severe disappointment. Front and back have little caramel. Contrast that to the bottom row. Look at the caramel on the front and the back!! Now that is hitting the sucker jackpot. When I get a sucker like that I just stop working, sit back, and just suck. So what does this have to do with time? Well, I ate three bags of these suckers (25 per bag) while assembling this dragon pair.
Here is the pair just before I separate them. I know what you’re thinking…what a mass of body parts! Trust me, it will be more clear when it’s finished.
Entwined dragons

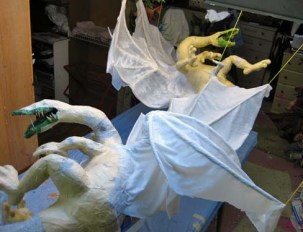


After the cloth dried I trimmed the wings with scissors.


I crumple small balls to use for details on the hands and feet and legs and arms. You can see the knuckles and calves I added using these balls.

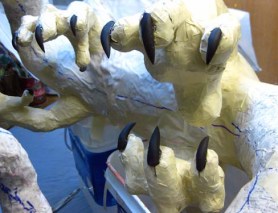
Here is her foot just before the cloth mache as well as his hands and feet. Again, his claws black, hers white.
First I added cloth to the feet and hands of each dragon.

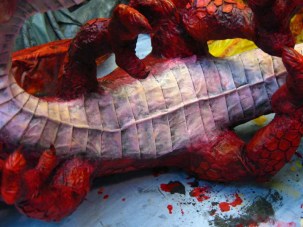
 Then I added the breast plates to both. I really enjoy working on the dragon’s bellies.
 I wanted a spine running down the back of each dragon. I cut one out of cardboard first and hot glued it on. Then I added cloth to it. I must say, cloth macheing the spine is one of my least favorite activities. Many hours of work.

I then added cloth to the rest of each dragon’s body. Note that, except for the jaws, I haven’t constructed the heads yet. I decided to finish both dragons and reattach them before finishing the heads. This is an act of delayed gratification. I love making the heads. It’s hard to stay away from them.
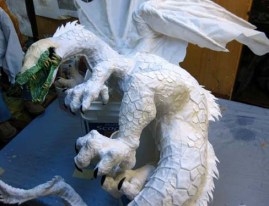
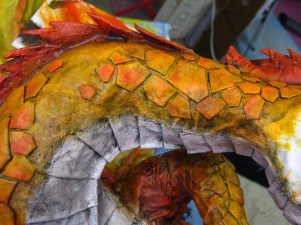
I decided to make scales this time by making polygons and fitting them roughly together. The effect can be dramatic once it’s painted.


I know it’s hard to tell the difference, but the dragon on the left is the female, and the dragon on the right is the male.

Next step, painting the bodies and reattaching the pair. They are having trouble staying apart. As you might guess, they really want to get together again.
 It is always easy at this stage it get enamored with the bright colors of the initial paint job. Everything looks so clean and pretty. But I’m reminded of what Bill Alexander used to say (he was the crazy but fun old coot that used to paint beautiful landscapes on TV with a house-painting brush). He would say that you, “can’t have light without dark.” To make these colors really stand out, and to enhance the details I’ve painstakingly added to these pieces, I needed to “blackwash” them. I water down some black paint then paint a part of the project and wipe it off before it dries. Photographs never really do this justice, so you’ll have to trust me about how great this works. Below is the female dragon after blackwashing. She looks dirty and her colors are certainly more muted. But she looks more like a dragon.
I do add some of the color back in the form of highlights. Again, these photos don’t show the change as well as I would have liked. But I think you can get the idea. Below is a portion of the female’s neck before highlights and then after. Can you see the difference? It’s much more profound in person.

It is even more dramatic with the red on the male. Look at the male body after blackwashing. Now look at it with highlights added.


I also highlighted the belly plates of both dragons. The color here is really subtle.

I brushed water over the painted claws just to soften the paint. Then I scraped it off with a knife. Latex paint (or acrylic or any combination, so long as it is water soluble) will not stick to Fimo. In fact, as my fellow paper mache artist and friend Randloph correctly pointed out, the paint actually comes off easier if you have a lot of paint on the claws rather than just a little bit. So don’t worry when you are painting around claws or teeth if you get paint on them. Rather, make sure you do get them covered in paint. The thicker the better. I really love seeing the claws and teeth emerge after being covered. The effect is dramatic.


Finally it is time to see if the two dragons still fit together (Are they still in love? Long distance relationships…in paper mache land that means a few feet apart…are very difficult to maintain.). A lot of shifting can happen during the construction and painting. I held my breath (not trying to be melodramatic here…Eddy just used his litter box in the next room) and twisted them back together. I was thrilled to find that they still fit together perfectly.


I constructed the faces. I once again decided on blue eyes for both. They really stand out. Then I added horns to both, black for the male (like his claws) and off white for the female (like her claws).
 I blackwashed the faces.

Here are finished faces up close.
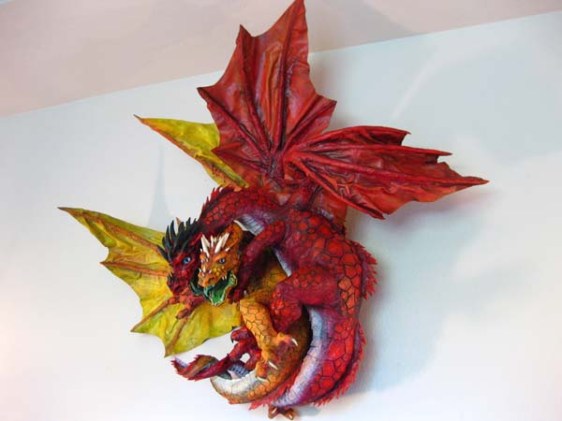
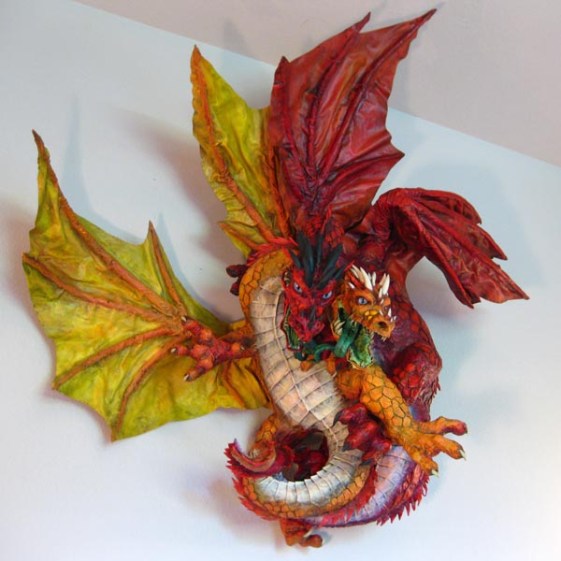
And here are two shots of the final project.

Hi it’s me again sorry to bother you but I’m having a hard time assembling the feet for my dragon, I like the way these feet look, could you explain how to make them?
Again, I’m just not sure how to describe the process. It’s a matter of taping the toes (fingers) to a wad of paper to start. You can bend the toes into the shape you want because of the hangers. Then use small wads of paper with tape for knuckles and other embellishments. Beyond that I don’t know what else to say. Just keep at it until they looks the way you want them.
Thanks for the advise, love the art
You are welcome. Good luck
hola me encanta tu arte quisiera aprender tu arte me re encanto, tengo alguna idea de como lo haces viendo tus vídeos, pero, lo que no se, es Que materiales usas aparte del papel 😦 con que haces sus alas y recubres al dragón que utilizas para sus escamas?????? por favor solo dame algunos consejos no te pido que me enseñes todo solo algunos consejos para poder aprender te lo agradecería bastante, Gracias de antemano
Hola Jorge. Añado una “piel” de tela (sábanas viejas) sumergido en pegamento blanco (para todo uso, al igual que los niños usan en la escuela). Tengo un libro que muestra cómo hacer que estos. Si usted realmente desea aprender entonces usted debe conseguirlo. http://www.gourmetpapermache.com/PaperMacheBooks.html Buena suerte!
Hi, I’m not sure if you’ll get this since this was posted quite a while ago, but I was wondering, what kind of paint you use for your dragons. Our drama department is making the Tiamat for our show, and I’m in charge of making the dragon heads. Right now, we’re getting the ingredients and all that jazz, and last time we took on a big project we used indoor paint. I wasn’t sure what kind to put on the list.
Thanks,
Allyson
Hello Allyson. I use all-purpose paint like you use indoors or outdoors. Just whatever you buy at Home Depot or Lowe’s. Good luck
Hello! I love your work. But I have one question. Is there a certain kind of fabric that you prefer to use for the paper mâché?
Hello Megan. I use old bed sheets and white glue. Nothing special. But it works great as a “skin”. I call it “cloth mache”.
Dan, all water paint will nog stick to fimo ??
The paint I use will come off. I’m not sure about all water based paints. I would think so. Sometimes I loosen it by brushing on a little water first.
This is incredible. I stumbled upon a video of yours earlier today. My future husband and I are huge nerds and incorporating Tolkein’s Lord of the Rings into our wedding next year. I don’t have much experience with paper maché but I’m ambitious and determined to make a dragon. Do you just use any kind of cloth for the cloth maché? And Elmer’s glue? I’ve read you can do paper maché with flour and water mixed equally. Can you do cloth maché that way, too?
Hi again Amelea. I don’t think I ever answered this. I use old bed sheets dipped in Elmer’s glue for the cloth mache. The flour and water paste is for the paper mache part, with newspaper strips. It would not work with cloth. Good luck!
Hola Dan realizas un estupendo trabajo. Me podrías decir ¿Cómo elaboras los dientes?
Hola Desert Recan. Normalmente hago mis dientes con arcilla polimérica como Fimo o Sculpey.
Muchas gracias maestro
You are welcome Desert Recan!
Amazing! I’m also a keen papermache artist…still learn every day! Your dragon’s beautiful! Well done…hard work payed off!
Thank you for the nice remarks Anneke! Good luck with your work!