
I’m going to make a snake. Not any old snake. But my rendition of the Hindu/Buddhist deity associated with the divine aspect of the cobra. It is often associated with dragons. So I’m calling mine, Naga-Dragon Queen of Snakes. Okay… a dragon-like snake is one step away from a dragon, right? Except there are no wings, or toes. Maybe I’ve just gotten lazy.
I started with wire clothes hangers, as always. You know, these used to be omnipresent. Now, it appears that the only places using them are dry cleaners. They still use the small gauge, white ones. Those work well. For this project I wanted to use the old, heavy gauge hangers. You can still get these online. That’s because there were so many made over the years. I wanted to insure a supply so I went on a buying spree a while back. I ended up with 1600 of them. My wife, and my mail person thought I was crazy. Anyway…. I straightened out about 10 of these hangers. I doubled them up and made a length the size of the snake I wanted, about 8 feet long.


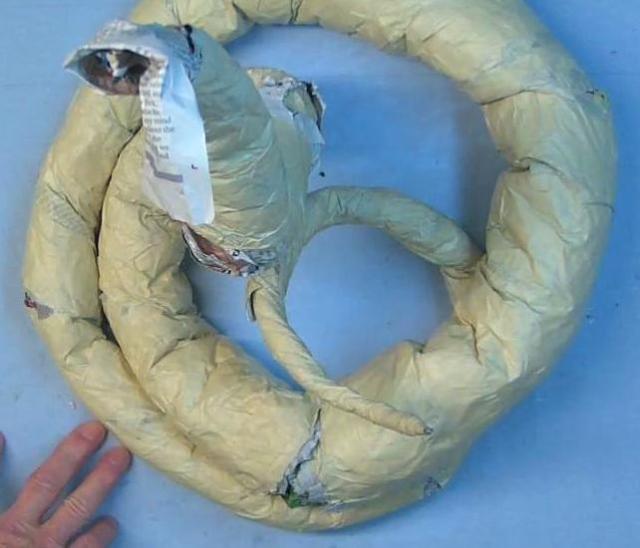


With the strips at an angle everything naturally works its way downward. I worked my way along the length of the snake squeezing out the excess paste as I went.

I added more layers where I thought it needed it for bulk and symmetry. Not that this step doesn’t have to be done perfectly. The details are added later with the cloth and glue.

This took a few days to dry completely. As an aside, I can’t tell you how many people have asked me how to get their projects to dry faster. They are under some crazy deadline (“I’m helping my kid make a paper mache dog for school! It’s due in two days! What can I do?”) Some go to elaborate lengths to accelerate the drying, including using a microwave oven. Don’t use an oven to dry your projects! (except for you Rick) My advice? Plan ahead next time. And don’t do your kid’s homework.

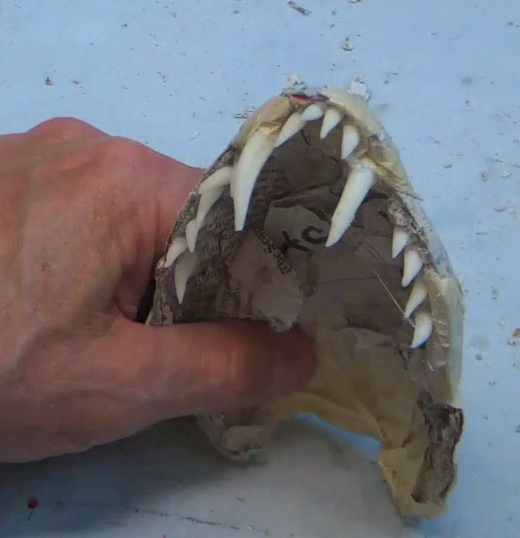
I made a nice mouth with some pretty fangs. This will be cobra-like so the long teeth seemed appropriate. I cloth mached the mouth and painted it.
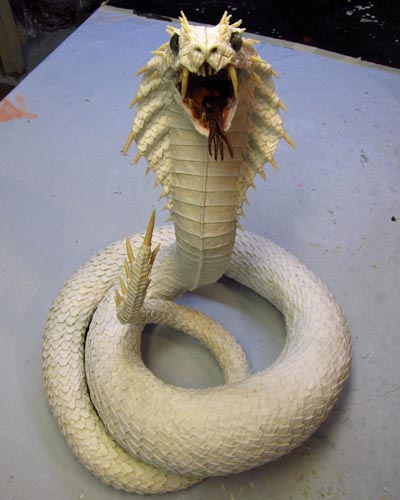
I added breast plates along the under belly. I’ll show you a better photo of those later. What I’m going to show you now is two full weeks of work. It’s amazing how long it takes to put scales on a nine foot long snake. These are similar to the dragon scales I make but I made these more hexagonal rather than triangular. These overlap like dragon scales would. Trust me, this was a real challenge considering the coil.

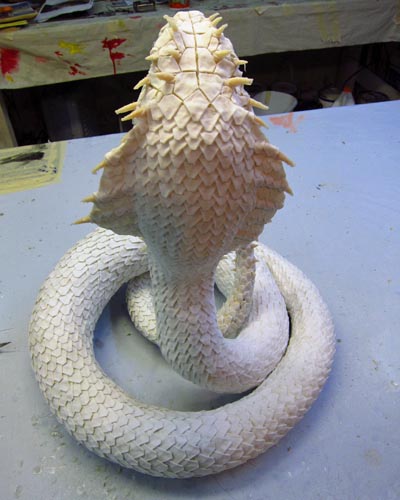
Here she is from the back.
I wanted to give you a close up of the scales on the head. Actually they are more like plates. You see this on most snakes. Of course I can’t do justice to what nature does for real snakes. My plates are far from perfect. I got as much symmetry as I could. This was painstaking, even more than the scales covering the body. It doesn’t look like it would be that challenging, but it was.


Here’s a view from under the chin. You’ll notice someone in the background. He’s not very happy. He wanted food. I told him he would have to wait a few minutes. I had glue on my hands. He’s not real patient. Like his dad (me). The most maddening thing was that after I shot this photo I cleaned the glue off of my hands and gave him some food. He just sniffed it and walked away. I’m sure he was pouting. I’m sure he waited till I was back at work before sneaking back to eat it. Little pill Eddie.
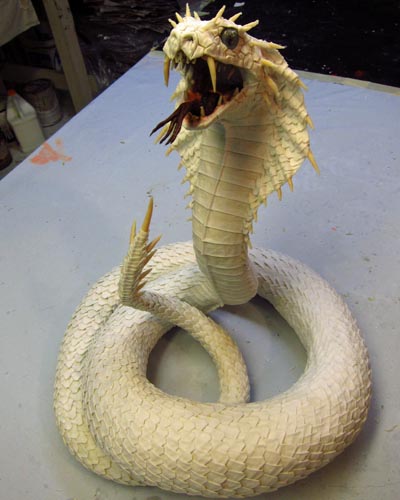
It’s a shame that most people won’t even see the underside of this snake. I just thought I’d show you the “breast plates” along the entire length of the snake.

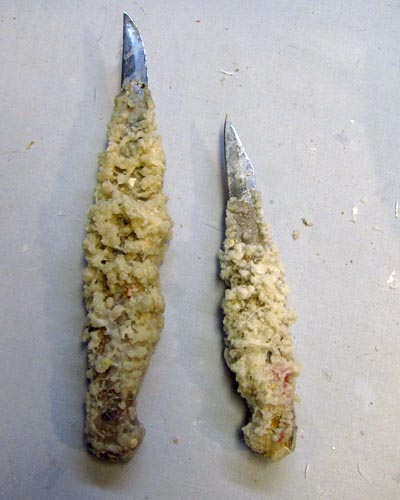
For no particular reason I thought I’d show you a couple of my tools. The glue from my hands gets everywhere. This is typical of everything in my studio, my phone, my TV remote control, the handles on the sink, everything.
While I’m on this side track I want to come back to the labor intensive aspect of these pieces. I can’t tell you how many people decide that anything called “paper mache” should not cost more than a hundred bucks. They are shocked when I give them a quote for a commission. After working an entire day to put scales on a foot or so of this snake, it becomes clear that I’ve probably put more time into the piece than I can recoup when I finally decide to sell it (if I want minimum wage). It just happens. The real bottom line is, I make this art for myself. I don’t do it with money in mind even when I take commissions. I won’t accept a commission unless it’s a piece that I’d happily keep if the deal fell through. It’s really about doing the work. Doing the work feeds me the right way. All you artists out there know what I mean.

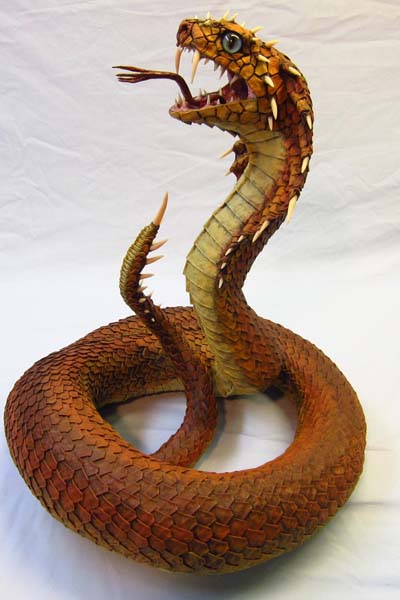
Naga- Front
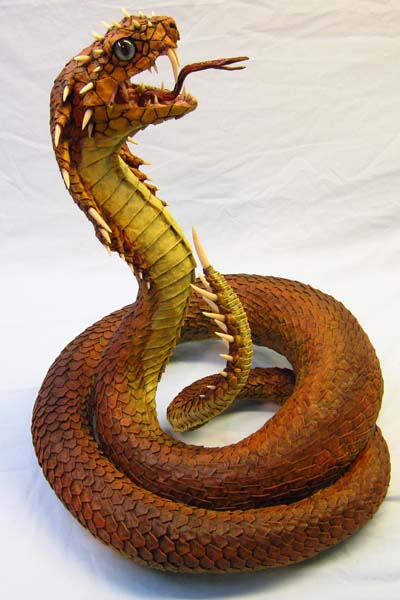
Naga- side

Naga- back

You’re work is absolutely amazing! Starting my own dragon trophy today. Just wondering how you do the glass eyes? or do you order them from somewhere? I’m from Canada, and looked in several art stores and couldn’t seem to find the same eyes you use or the materials to make them. Thanks in advance 🙂
Hello Jill. Thanks for the kind words. I use taxidermy eyes. If you Google “glass eyes taxidermy” you’ll find all the companies I use. There are three or four. Good luck!
Hi. I love the way you explain your work and your generosity bringing your secrets (and your cat!). One question: what kind of paint you use? (well, two questions) what kind of cloth you use? thank you for your answer and for your art. (I´m a spanish speaker, sorry) Saludos desde Buenos Aires. Alejandra
Hell abalderrama. I use old bed sheet for cloth. The older the better. And I use all-purpose paint, like what you use to paint inside your house. Good luck with your art!
its beautiful!
Thank you Ananya!
totally amazing im going to try a snake and a pelican or two. I live in far north queensland with the crocodiles …mmmm they could be interesting. I recently completed an enormous dragon that looked fantastic if I may say so myself!!. I wondered if I could put anything outside we have an opportunity up here to display in the town streets and would love to create some animals that could withstand a little rain. If you have any suggestions that would be great. Your handbook is awesome thank you…trying to keep the glue off.
Hi Amanda. Your dragon sounds great. I don’t have any suggestions about weatherproofing now that it is made. I would have suggested using “exterior” products in the making, like the paint and glue. And making sure there is not avenue for the rain to make its way inside the dragon. But maybe you did those things. Still, a little rain is one thing. Making something to last for a long period of time outside is very different. Good luck on your new projects!
How do you make the scales?
Hello Janice. Those are square pieces of cloth with corners folded to make a triangle. Then I clipped the tip off with scissors.
Thank you 🙂
Muy buen trabajo, te felicito. Yo me dedico al arte de papel en Panamá. Pues toda vía no he trabajado ese estilo de usted. Me dedico a enseñar a niños y jóvenes de escasos recursos económico en mi país. Con todo respeto cree que me puede decir, cual es la goma que usa ya veo que el papel es de periódico impreso. Usted le dice papel mache. No sé si estoy equivocado. La pintura que uso es acrílica no se usted cual usa. Saludos
Hola. Lo siento. Yo uso un traductor y no hice un buen trabajo. No entiendo la pregunta. ¿Se trataba de la pintura? Utilizo toda la pintura propósito, como se utiliza para pintar el interior de una casa. Es acrílico / látex.
ola belo trabalho como você faz a cola e é a mesma usada no pano mache
Eu uso cola branca para o mache pano.
i love your work. its inspirational to watch. my friend showed me your equinox dragon and i haven’t stoped watching how you do your work. but i have a question. i am currently working very hard on a project and wondered if you wouldn’t mind telling me what material you use to give your dragon wings that realistic weathered look and if so where i can get it from.
Hello Lynn. After sculpting with paper mache I add a “skin” of cloth (just old bed sheets) dipped in white glue (like Elmer’s). I call this process “cloth mache”. Since most all purpose paint is made with latex (rubber) and acrylic (plastic) it bonds with the cloth to make it feel like leather. This process is perfect for wings (and other details). Good luck!
thank you! i look forward to your next project!
You are welcome. I will finally finish Drogon today. And I will reveal another that I’ve been working on soon. Take care
Hey there, your work is pretty magnificently amazing. As is your love of the Cat…do you ever do workshops? I live and work nthe centre of Australia, and would be more tham willing to attend.
Thanks Sandra. Glad you like my work. I live in Seattle in the US. I don’t do workshops because people who want them live all over the planet. I just couldn’t get a critical mass together. That’s why I wrote my books and made this blog. Take care
How do you make the shape for the head? I’m thinking of making a cobra snake head for a cane.
Hello Michelle. I used the shell of a small paper mache ball. I made it somewhat egg shaped. Not sure what else to say about that. Good luck
Really good work……. one questions can you do this is in one week?
Hi Shazam. Not this project. This took a month. Too many scales!
ОЧЕНЬ КРАСИВО!!!!!!!!!!!
Хочу попробывать сделать сам.
Спасибо. Да, вы должны попробовать. Вы бы наслаждаться этим. Удачи!
добрый день вы не подскажите из чего делали чешуйки по всему телу змеи ?
Здравствуйте. Добавить “кожу” ткани (старые простыни), смоченным в белом клей (все назначения). Я сворачиваю куски ткани, чтобы сделать весы.
большое спасибо
здравствуйте. не подскажите размер глаз?
Эти глаза 15 мм.
lo felicito por su gran trabajo realmente es increíble
tengo una consulta como se hacen los dientes , los cuernos ?
Hola. Gracias por las amables palabras. Los dientes están hechos con Fimo, una arcilla de polímero.
muchas gracias
otra consulta de que grosor es el alambre?
Esos son pedazos de alambre de perchas
please can you tell how to make fangs?
I use Fimo to make the teeth. It’s a polymer clay.
Making a “whiskerina” beard for a competition (girls make crazy, elaborate beards to compete in beard competitions next to men) and I’m trying to figure out a way to make a single snake beard… Jeweled, I’m thinking… Anywho, my questions is… Without the scales (mine will either be rhinestones, or sequins) how heavy do these pieces get? If mine is roughly 4 feet, with a head the size of a fist… As I’ll be attaching this to my face, I’d hate for it to be more than 10lbs… Ha. Thank you!!!
Hello Monica. I think it would be a couple of pounds. I’m not exactly sure. I would worry about torque. If it is that long and comes out from your face at too much of an angle it will create a lot of stress at the chin. If it’s hanging down it won’t be much of a problem. Good luck with that! Sounds fun.
Bonjour ! C’est fabuleux ce que vous faites !! J’ai découvert votre art par une vidéo partagée par une amie Facebook, et je suis immédiatement venu voir votre site ! Ca donne vraiment envie d’essayer (je fais beaucoup d’origami, et j’avoue qu’essayer un nouveau art à base de papier m’intéresse !). Que me conseillez vous pour débuter ?
Bravo encore, et bonne fin de semaine 🙂
Merci pour la belle note. Je suis heureux que vous aimez mon travail. Je voudrais faire d’abord un monstre simple. Vous pouvez apprendre les techniques, et avoir du succès parce que personne ne peut vous dire comment un monstre devrait ressembler. Bon chance!
Hi! me and my friend want to do this for our class project. 1) How do you make the head? 2) How do you attach it? Thanks so much!
I think I showed the making of the head on the blog post. Look at that part again. I just taped the head onto the body using making tape. That’s all. Good luck!
hi! Your artwork is amazing! Do you think it would work to use colored fabric swatches (cut hexagonally) as the scales? would the glue still be transparent and would it be the right texture? Thanks so much!
Hi Beans. I would worry a little about the thickness. You need more than one layer of cloth I think. That’s why folding pieces of cloth works so well. You get multiple layers of cloth that way. Maybe that’s what you meant. I guess the texture would be all right. I think you’d have to try it and see if you like it.
Good luck!
Primero que nada quiero decirle que su trabajo me tiene impresionada, sería un orgullo llamarlo maestro,me parece que es usted un verdadero artista,y de verdad que lo admiró bastante,esperó su próximo proyecto 👍👌👌👌👏👏👏👏👏
¡Muchas gracias por las amables palabras Ana! Estoy muy feliz de que te gusta mi trabajo. Aprecio la nota.
Your pieces always look great I’m so jealous. What kind of paint do you use on your projects.
Thanks Amelia. I just use all purpose paint. Any paint will do but I prefer water based paints.
Oh nice thank you so much
You are very welcome. Good luck!
hermoso trabajo me quede impresionado. una pregunta que topo de tela utiliza?
Gracias. Yo uso sábanas viejas. Nada especial.
This is one of my favourite pieces by you the work involved really shines through, did you use cloth pieces for the scale effect? I am hoping to try to make a trophy head soon. Will any glass eye fitted allow light to penetrate or must you buy a certain type, or perform an adaption? Many seem to be manufactured with an image affixed to the reverse. Many thanks. Keep sculpting!
Hello Paul. Yes,like most of my scales I folded pieces of cloth dipped in glue. I buy my eyes from taxidermy companies. They are beautiful glass eyes with lots of depth. What you are describing (I think) are cabochons with photos of eyes glued to the back, although that is just one person who makes those and sells them Etsy. I don’t like those. They are too flat. Good luck!
Many thanks for your reply 🙂
Pingback: 101 DIY IDEAS FOR PAPER MACHE ARTS AND CRAFTS FOR KIDS – KIDS DIY ARTS AND CRAFTS
Hi, I actually adore your snake and I am looking to make one. I was just wondering after you paper mashed the snake what did you cover it with? it looks like scales. its so cool!
please answer me as soon as possible because it has to be done within two weeks.
many thanks
lea
I add a “skin” of cloth (old bed sheets) dipped in white glue. The scales are small square pieces of cloth folded into points. Good luck!
Hi, its lea again, I just want to know how you managed to straighten out all the metal hangers. Did you use a special tool?
also, how did you put the straightened metal hangers together. did you use strong tape or a glue gun.
please answer me as soon as possible because it has to be done within two weeks and I want to get started already.
many thanks
lea
Hey Lea. I use heavy duty pliers/wire cutters. It helps get the kinks out of the wire especially if you are using the heavy gauge wire. I put them together with masking tape. I don’t know if you saw it, but beside the video, I detailed the making of this project on my blog, step-by-step, with commentary. You can check it out here, https://papermacheblog.com/older-paper-mache-projects/paper-mache-naga-dragon-queen-of-snakes/.
thanks soooooooooooooo much. you are so helpful!
do you think this is an impossible task for a 12 year old to undertake. thanks again for your amazing help.
I think a 12 year old can make a decent snake. It might not be as polished, but it will turn out well I think. Only one way to find out…. 🙂
Hola, disculpa soy de colombia y me eh fascinado viendo tus videos de dragones pero sigo con la duda como es esa tela blanca que usas ¿como la haces? por sabes muy eso es un toque de perfección a cada dragón !por favor dime como haces esa tela o como se llama y con que agregarle¡ saludos
Hola Andres. Sí, estás en lo correcto. Agrego una “piel” de tela (sábanas viejas) empapada en pegamento blanco (multiuso). Permite buenos detalles. ¡Buena suerte!
Hello I was wondering if the snake ended up heavy or is it lightweight?
Hello Lisboa. It’s kind of hard to know what you think of as “light.” It’s probably only a couple of pounds. I don’t think of it as heavy.
Exelente trabajo amigo una pregunta que usa para hacer las escamas y los colmillos de resto muy buen trabajo lo felicito eres un gran maestro en este tema
Gracias por las amables palabras Thomas. La “piel” (incluidas las escamas) está hecha de tela (sábanas) mojadas en pegamento blanco. Hago las escalas doblando la tela en triángulos, y luego cortando las puntas. Hago los dientes de arcilla polimérica como Fimo o Sculpey.
Hi Sir
How Much Do You Sell It
I Tried My First Project ButvI Cant Do It
The Papers Were Separate And I Cant Do It
Hello Ricky. Sorry I no longer have this project. Like anything else practice is needed to make what you want. Give it another try?
Amazing!!❤️
Thank you so much!
I love your projects and having the generosity to create such wonderful documentation of your work. I am going to try to make one for the Chinese New Year of the Snake 2025… and your work gives inspiration for me. I don’t think I have the time to do individual scales but i may try to paint texture like.
Beautiful!! Can I share my pics when done? if so … what email can I send to?
Hello Ella. Thank you for the nice remarks. I’m very happy you like the work. I would love to see what you make! l’d be happy to post photos of your work on my site. Send the photos to dan@gourmetpapermache.com. Good luck and have fun!