
Hi again. More about my commission for the Chromatic Dragon restaurant in Savannah, Georgia. I mentioned earlier that I intended to take some artistic license with the Tiamat dragon. But I have a real interest in satisfying the restaurant’s clientele, and of course the people who commissioned me to make this hydra. So I want it to look very familiar. That means I’m not going to totally fly by the seat of my pants. I want the project to have a familiar “feel”. I want the look of the project to stay true to the Tiamat in Dungeons and Dragons. So I looked at a lot of Tiamat art on the web for guidance. Some of the renditions I liked, many I didn’t. It just turns out that the renditions I liked the most are the ones created by The Wizards of the Coast for the official Dungeons and Dragons site. Below are two of the Tiamat dragon wallpapers you can get (for free) on their official site (http://dnd.wizards.com/articles/media-resources/wallpapers#submenu-title). This set of wallpapers is titled “Tyranny of Dragons -Set 3”. I looked on the site for any mention of the actual artist who painted these wallpapers but I couldn’t find any information. I would love to know who did the paintings. They are beautiful works of art. So beautiful that I’m taking my lead from these wallpapers for my sculptures. I will try to incorporate many of the features you see in these wallpaper into my trophies. Where it’s hard to see some of the details in the paintings, I will ad lib. Of course I can’t insert fire into the throat of the red dragon, but I wish I could. I’m sure some of you will think it is cheating or somehow copying the art. Maybe. I can tell you however that it also adds a layer of difficulty. I’ll be curious what you all think as this project progresses.


So I left off with a very large pile of pieces ready for paper mache. I always use cheap white flour and water for my paper mache paste. It has always worked well. But the climate in Seattle is very different than it is in Savannah. It’s much more humid there in the summer. I don’t want to take any chances with bugs (I’ve heard this can be a problem). For this project I decided to use Elmer’s glue instead of flour and water for the paper mache. I used the glue full strength. It’s a little stickier, but it works just as well as the flour and water. This is also a good substitute paste for people who have allergies to gluten or flour.

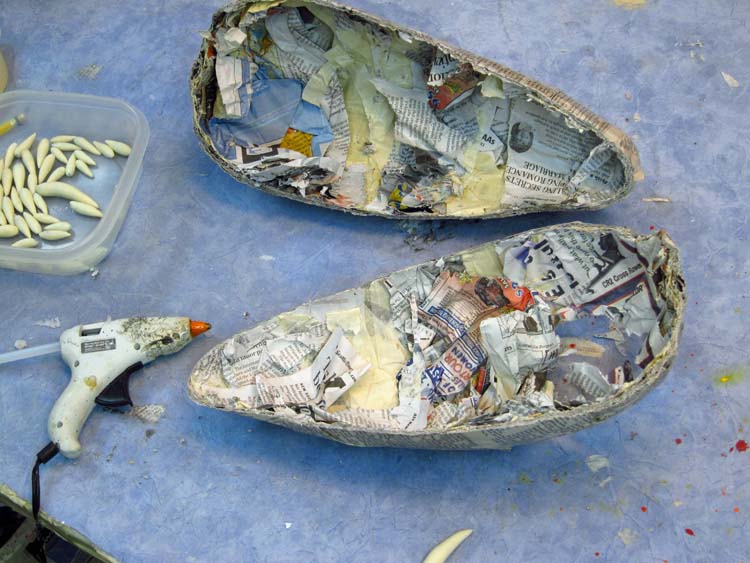
I always start my trophies with the jaws. After my paper mache dried I cut open each of the head-shaped pieces.

I pulled out the wads of paper that were inside (which I throw into a box to be re-mached later) leaving just the paper mache shells. I use these shells to make the jaws.
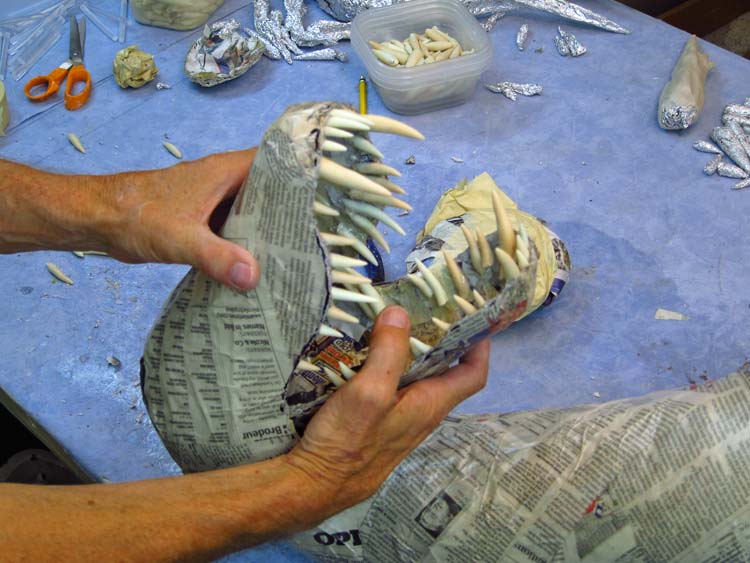
My first big decision had to do with the kinds of jaws I wanted for each dragon head. I use hot glue to add teeth to the mache shells when making jaws. As I mentioned before I think of the red dragon as being the most aggressive, the most wild. So I made a sort of wild, somewhat random tooth pattern in the jaws.

In contrast, I made a more evenly spaced tooth pattern for the white head. Overall, I think of the white dragon as the least wild (in appearance) of the five heads. I wanted the jaws to reflect that bias.

I decided that the green dragon should have longer, sharper teeth than his counterparts.
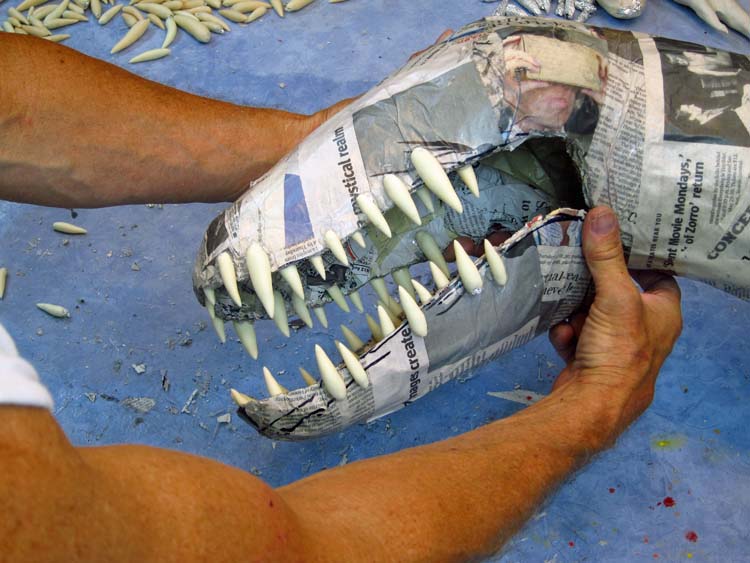
I gave the blue dragon a mouth that would befit a crocodile.
Finally, I thought the black dragon should look more gaunt, even skull-like. That is how he’s described in the literature, with deeply sunken eyes. I’m not sure exactly why I thought this pattern would work but thought fewer teeth, more clustered, would work well for the black head.

I also made similar, but yet distinctively different tongues for each dragon. More about these later.

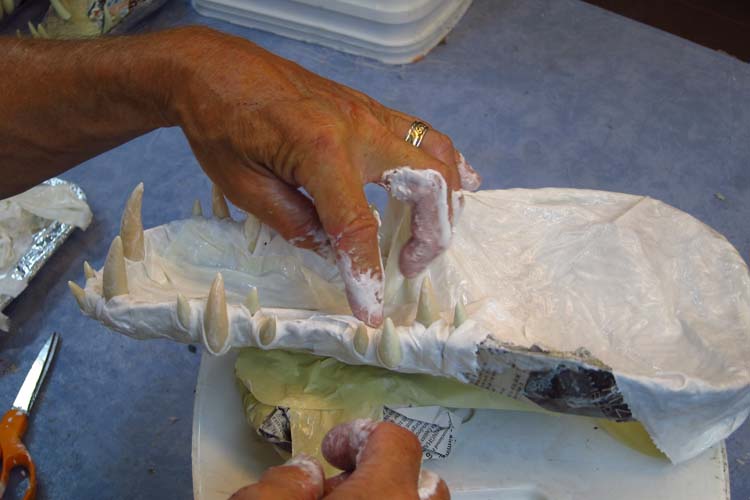
I always cloth mache , and paint, all my jaws before assembly. It is just so much easier to do this before everything is put together. Trust me.
Here are all the cloth mached jaws (I know, “mached” is not really a word)(and the phrase “cloth mache” is downright silly. But that’s what dubbed it years ago, and it works. So there.)

Here are two sets of painted jaws, one before blackwashing, one after. This is one place where I inserted my own artistic license. The Tiamat dragon, as a hydra, is very distinctive. Considering that all of the heads are so different, I was looking for ways to pull them together. So I decided to paint all of the jaws and tongues the same colors. I also used the same color Fimo for all of the teeth. This consistency in the jaws will look good in the end. You’ll see.

Likewise, I made all of the horns out of the same color of Fimo. This is one of the horns I made for the black dragon. In the literature about the Tiamat, as well as the art, the black dragon is described as having very prominent, bull-like horns. Since it’s such a big part of his personality, the horns had to be special. I think these horns fit the bill. I’m very pleased with how they turned out.
Below are the sets of horns for each head. They are organized into piles below. In the front row, on the left is the set of horns for the black dragon. The red dragon’s horns are in the middle in the front, and the set for the green dragon are in front on the right. In the back on the left are the horns for the white dragon, and on the right are horns for the blue dragon.

I’ll leave you here. Next time I’ll start assembling each head.
Thank you for stopping by!

Great update! It is jam packed with information goodness! Thanks!!
Thanks Rick. Glad it helps!
Amazing!! The jaws/teeth of the green dragon are my favorite so far. I knew that you used fimo for the teeth but do you usually use it for the horns? I think that’s foil I’m seeing on the ends, is that throughout the length of the horn?
Hi Jill. Yes, for these horns I stretched Fimo over an initial form of aluminum foil. Otherwise it would cost a fortune for Fimo. It works very well.
Oh, wow. That’s that’s a lot lot lot of claws and teeth.
It’s looking good!
That’s true. Thanks Daniel.
amazing….especially the horns….now as I started my first project on a mache dragon I can imagine how much work in fact this is…by the way, thanks for the books Dan, these are really inspirating
Thanks Thomas! Glad you are enjoying the books. Good luck with your projects!
I would love more detail about how you did the unique texture of the large horns. Great job!
Hello Willie. I made the basic shape in foil, then stretched sheets of Fimo over them. That’s it. Nothing fancy.
Woow at those horns! They look really really cool!!!! BTW Dan, when you bake big pieces like those, do you hang them some how in the oven, or you just lay them in the tray like you would do with the teeth? Don’t they flatten a little bit on the bottom side (the side touching the tray)?
Hey Nacho. Nice to hear from you! The big pieces do flatten a little on the side against the sheet. But I watch for that. I make sure the flattened side is the least visible on the finished project.
Amazing! I could sit and stare at those photos and your work for hours on end. To bad you can’t rig up some kind of lighting inside the red’s throat but then you would have to deal with someone else trying to change the light if the bulb burnt out (not a good thought). I also wondered if you tried the wallpaper glue in your mache, I have and love it just for the fact that it is so silky smooth and none of the stickiness that the white glue and water give. Mixing it is a challenge the first couple times to make sure there is no lumps as they never go away, but once you get the hang of it it is great. As always can’t wait to see how the dragon(s) turn out and looking forward to your next post.
Hi Kat. I’ve used l.e.d.s for lights inside mouths. I just don’t think I need any lights for this though. Thank though!
I like the fact that you look at artwork to get your idea’s for sculptures. the horns look great. Leaves and fire are some what the same shape. Like a maple or oak leaf, only smaller and stretched out longer. I’ve been thinking about how I could use that in my dragon masks. Your work has inspired me to do things I never thought possible. It’s fun.
Hi Claudia. So glad to hear you are having fun with this medium. I’m not sure I will try to emulate fire though. But thanks for the ideas.
Looking pretty awesome!!! As an avid AD&D (1st ed.) player, this is beyond cool!
Thanks Tim. I hope you end up liking the finished piece.
Thanks for sharing this WIP. I love your art.
Thanks Diane!
This is just amazing. The black is my favourite of the dnd dragons. I can not wait to see this take shape and come to life! The horns look absolutely wonderfull! Keep up the good work 🙂
Yes, I love the black the best as well. I really like the horns. But they will all be nice, I promise.
My God Dan, what a massive project you have taken on, you must love your work. I can’t wait to see them finished, are you doing heads only, or whole bodies as well. I would be flat out doing 1 head let alone the lot of them. Good onya.
Hey Leslie. Nice to hear from you! I’m only doing the heads. That is a big enough task. But I’m really enjoying the challenge. Thanks for stopping by.
OMG if you can produce anything like those wallpapers this will be your crowning achievement IMO. That one tail is awesome (the large one). You are a true artist my friend. I have had a ton of “likes” about your artwork on a FB post of mine sometime back. This project will be stunning.
Thank you Ralph! I really appreciate the confidence! Yes, the horns on the black dragon are cool. I’m very happy so far. Thanks for watching!
Sorry I called the horns tails. Sure looked like a tail, my bad.
Lookin good. You are an inspiration to all of us Dan the monster man!
Thanks David!
She is going to be huge! It’s really fun watching it all come together. Five heads means five times the fun! Your attention to detail proves that this is a labor of love.
Hey Lyman. Thanks as always. Yes, this is proving to be quite the challenge. But I am really enjoying it. I have to get another post out there.
Hope you are also making lots of art!
Those horns are just stunning! I’m so excited to see the different heads and the personalities they’re going to have.
You’ll be glad you used Elmer’s glue. I couldn’t get away with using flour glue here in NZ. Humidity is really not kind to it and it develops mold.
Hey Stella. Thanks! I’m happy with how the horns turned out. Yes, high humidity is a problem. Can’t take any chances with a commission.
Hi there! I love your art work! I am planing to try a dragon head with my son and was wondering how you make the teeth and looks like the cloth are used after papier mâchée? What king of cloth you use?
Thanks I appreciate😊
Jessica
Thank you Jessica. I usually make teeth out of polymer clay like Fimo or Sculpey. After sculpting with paper mache pieces I add a “skin” of cloth dipped in white glue. The cloth is just old bed sheets. Good luck!
I think your dragons are GREAT. But one question, where did you get the teeth?
Hello Linda. Thank you for the kind words. I make the teeth out of polymer clay. Brands include Fimo and Sculpey. You can get it anywhere they sell craft supplies (or online of course).
Great! Thanks.
Fantastic dragons!!!
Hola. Podrias enseñar como juntar las cabezas al cuello. Me han ayudado mucho tus consejos. Intento hacer un dragon de sant jordi q es de cataluña, españa. Lo hare risueño, es dedir, no agresivo, pars ponerlo en un escaparate de una tienda el dia de la festividad, q es en abril.
Gracias
Hola Joaquina. Solo uso cinta adhesiva para conectar la cabeza al cuello. Eso es todo. Usé cinta adhesiva para unir todas las piezas. ¿Quizás entendí mal la pregunta?
i love how they have so many teeth you are now my website that I go to for my dragon costumes.
Just seeing your comment. I’m very flattered! Good luck with your art!