
Hi everyone. Well, this has been another case of ADHD art. I started on Drogon, but ended up making a zombie dragon. I was planning to do that for Halloween. But I just got swept up in it. So let me show you a little of this one, then I’ll get back to work on Drogon.
Just because you are my blog followers I’ll be honest and tell you that I would do this differently if I were to do it again (even though I kind of want to because I’m compulsive, I won’t be doing this again). I envisioned one side of him that was a little less rotten so that you could see what the dragon would have looked like pre-zombie. That became this side.

Zombie Paper Mache Dragon- less rotten side
But then I wanted a side that was more rotten. That’s turned into this side. See, you can see the skull and lots of sinew and rotten stuff.
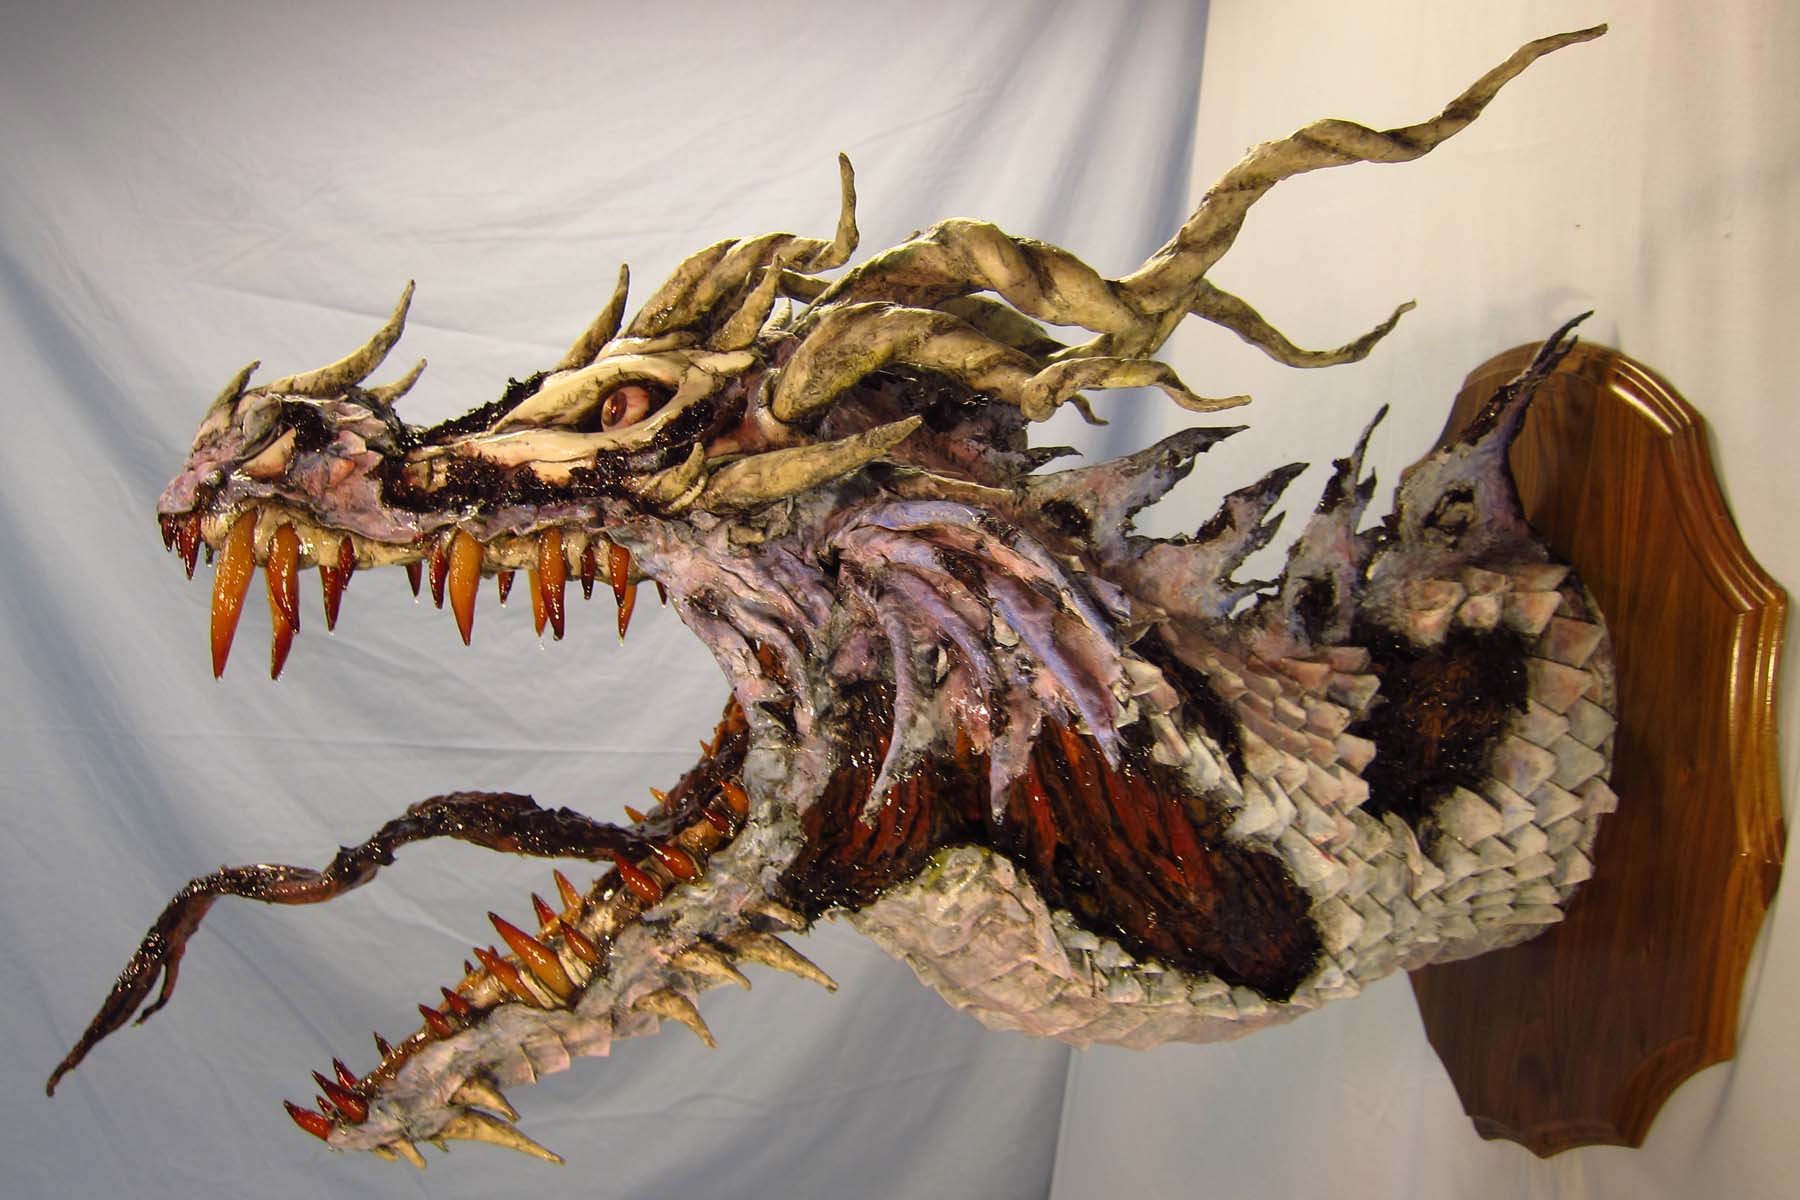
Zombie Paper Mache Dragon- more rotten side
But now I wish I’d made him much more radically rotten on both sides with more sinew and bone and maybe some veins showing all over. Still, over all I’m happy with how this project turned out. Rather than being creepy it turned out quite pretty. I always say this, but I’m going to say it again anyway, this dragon is much nicer looking in person. There are many subtleties in the color the camera just didn’t pick up. For example it’s hard to tell that the holes on the neck are really deep and that the sinew has many colors in it. Here’s a close up to show you what I mean.
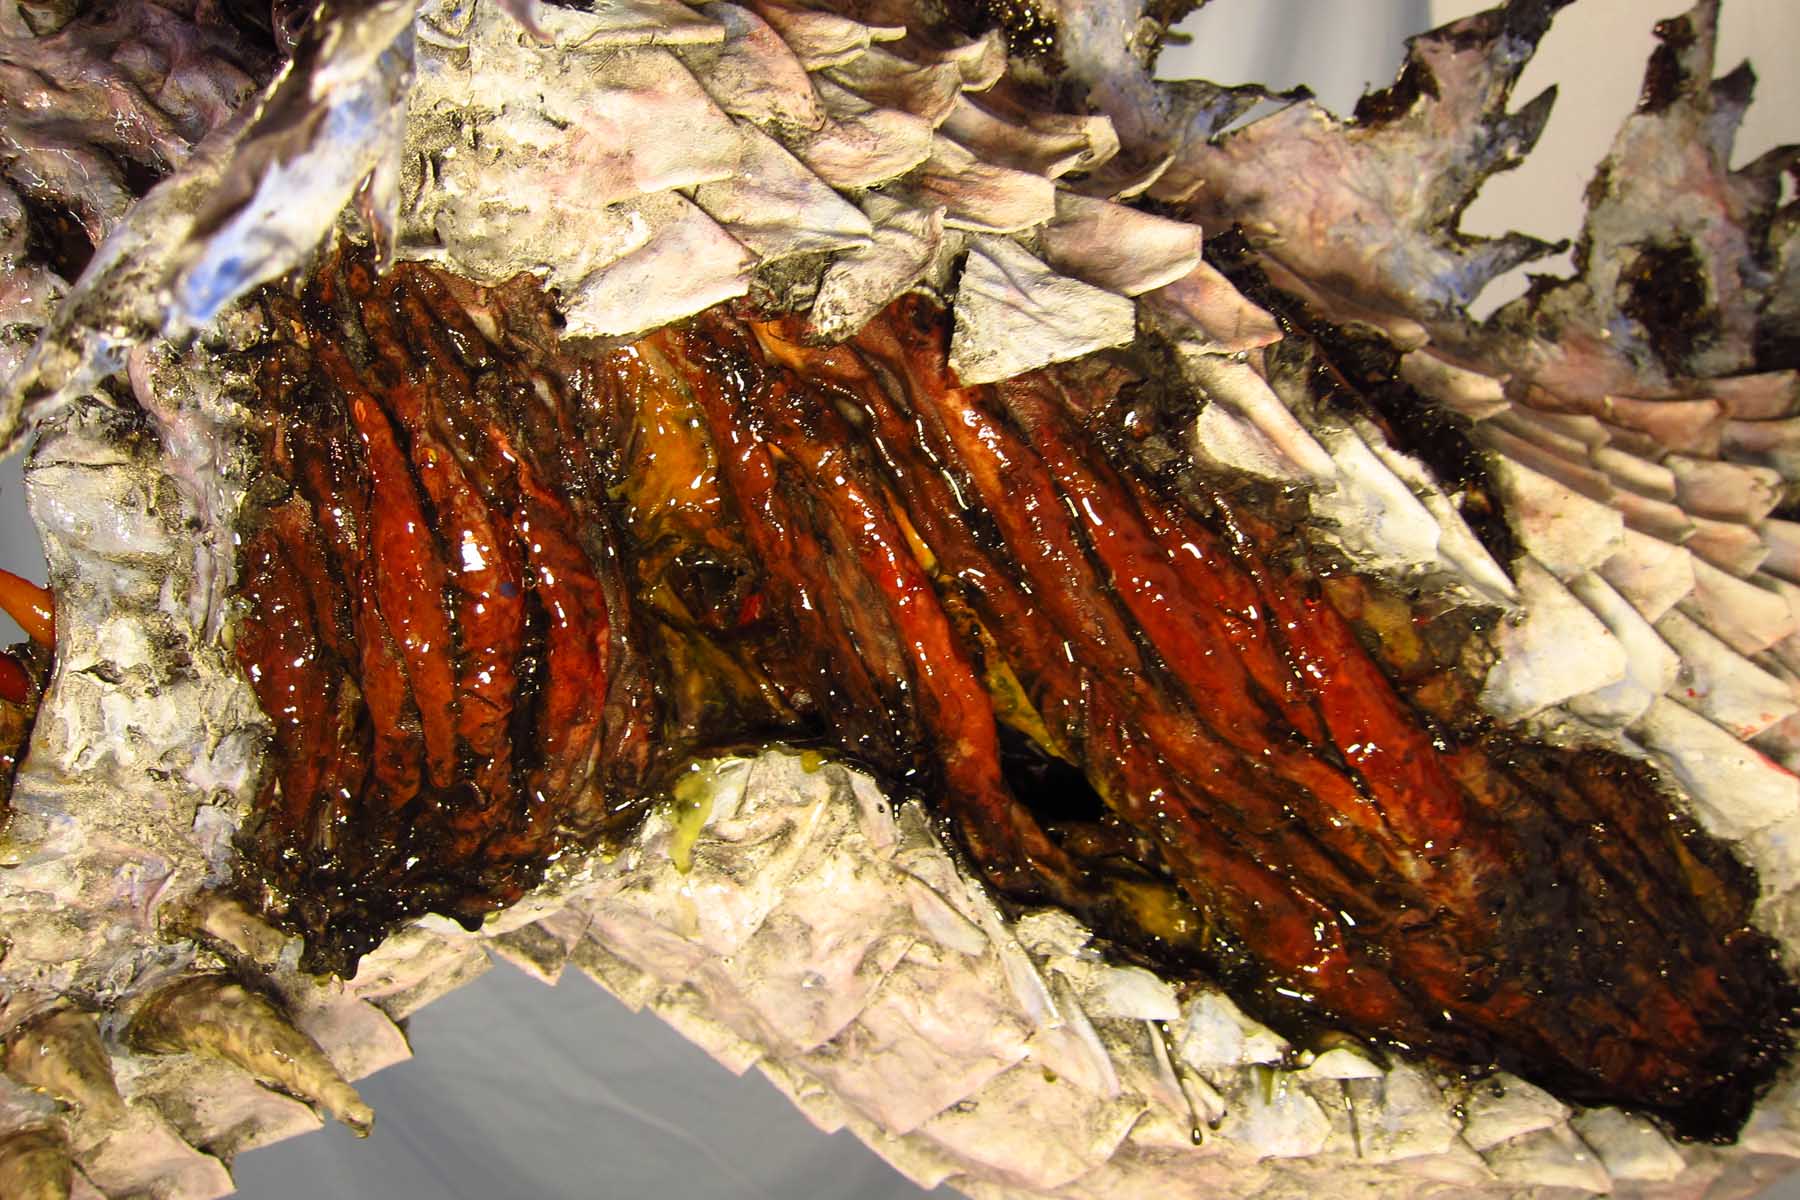
Zombie Paper Mache Dragon- sinew
See what I mean? And it’s really hard to see the nice movement in the neck. Look at it from underneath (I’d just finished the breast plates).
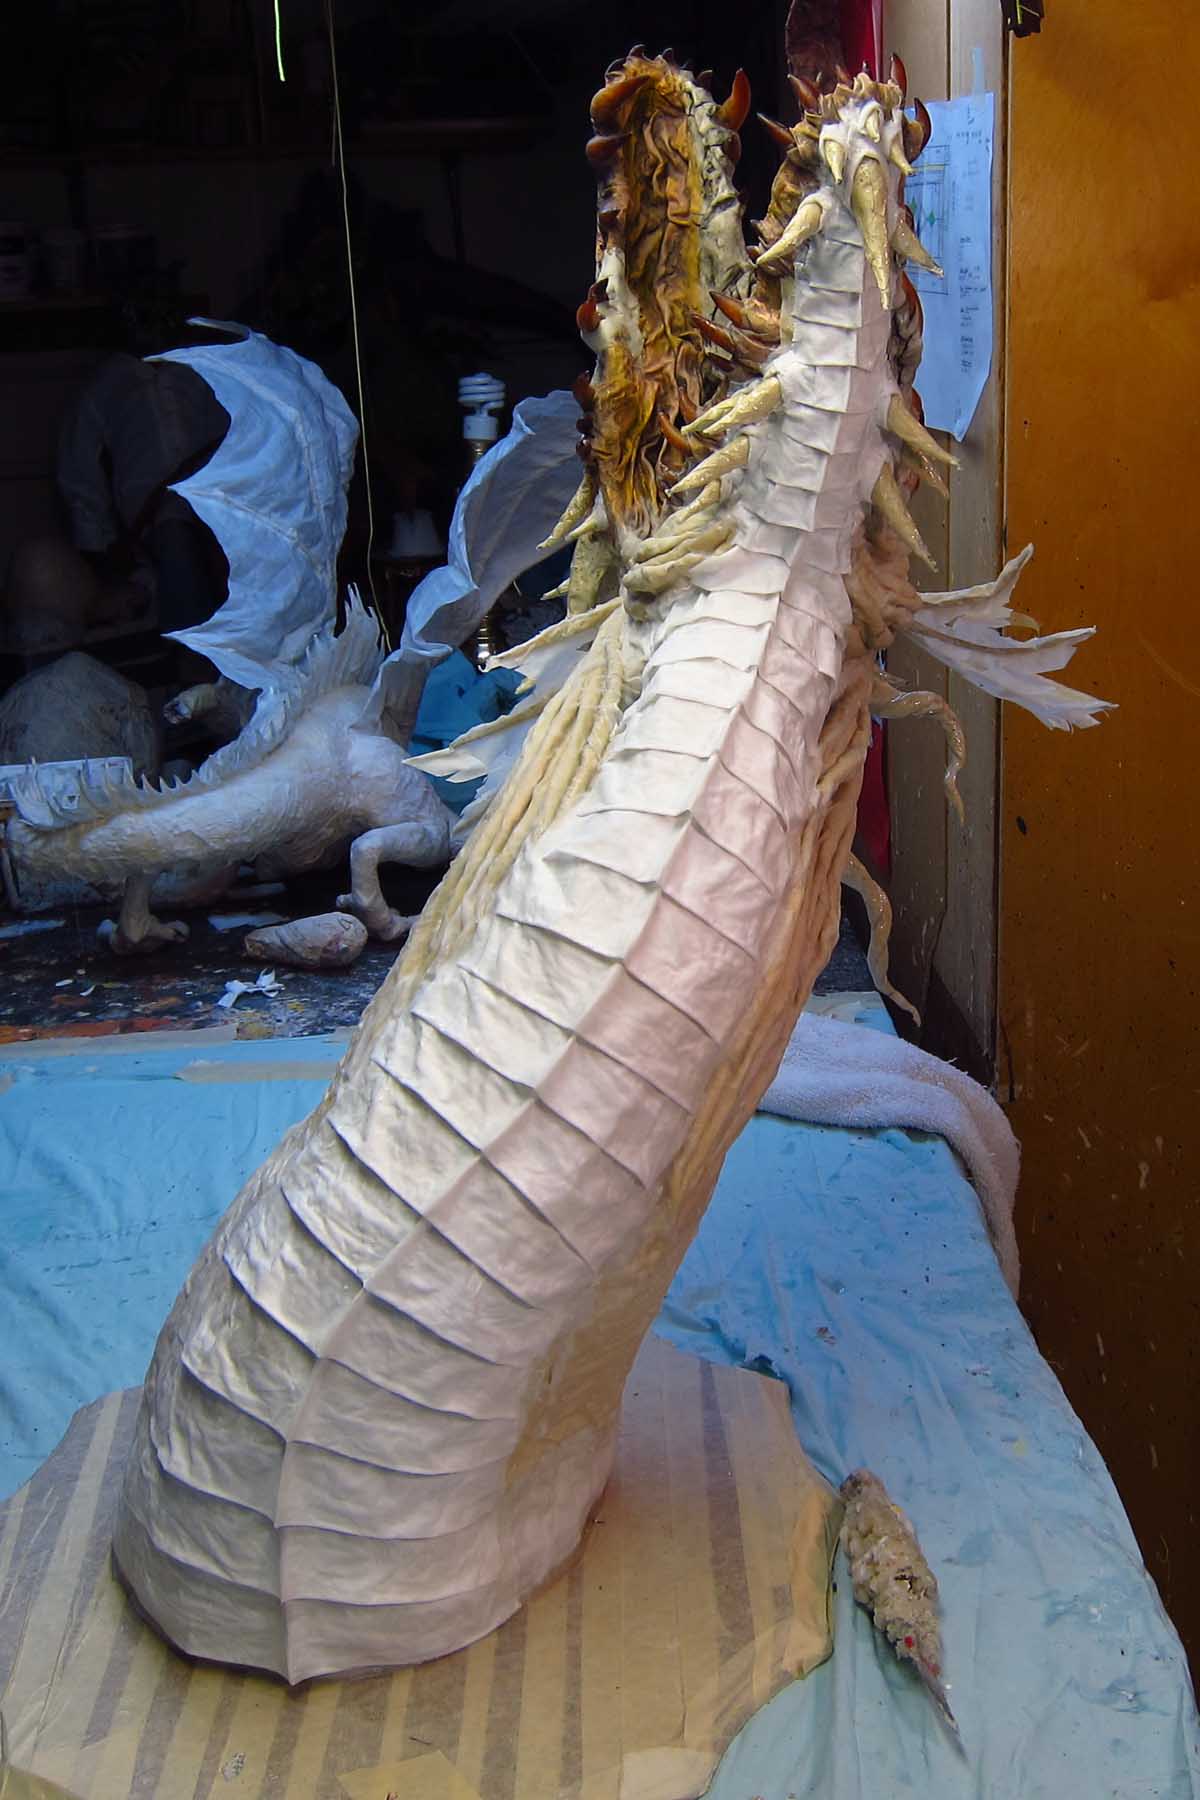
paper mache zombie dragon-breast plates
And I added some lights behind the eyes. It seems a little goofy. The eyes are really nice without lights. I had Robert from Masterpiece eyes (www.MasterpieceEyes.com.) make them for me. They are soft and I noticed that they diffused light really well. So I added the l.e.d.s behind them. They really do turn the eyes a very nice glowing red. So I take my previous comment back. They aren’t too goofy. They are kind of cool especially with the lights low.

Zombie Paper Mache Dragon- close
Finally, I did make a video of this project if you are interested. You can find it here: http://youtu.be/7dhYR3R6tQ4
Okay, so now I’ll get back to Drogon. Thank you for your patience!

Fantastic…amazing..unreal…incredible. I wish I was better with compliments but this is beyond words!
Amazing! Connie
Connie Austin conzaustin@gmail.com 541-728-7120 “The privilege of a lifetime is being who you are” — Joseph Campbell
Hello Connie! Wow, what a surprise! Nice hearing from you! Thank you for stopping by. I hope all is well.
That is wild! Love your cameo, that in itself was a piece of art, lol…
How can a zombie dragon be so stunningly beautiful? Both sides… I really think this is superb, Dan, and I’m so, so impressed with your skill.
Now I’ve seen the video and I’m even more over awed! Fantastic, Dan!
Great Job! I look forward to all your blogs. love them all. how did you get the teeth that color? Melinda
Hey Melinda. Thanks for the nice comment. I just left the Fimo in the oven a long time, way longer than you are supposed to. Then again, I’ve never known exactly how long to bake polymer clay. It gives directions for 1/4 inch pieces and we are left to extrapolate for bigger pieces.
It is hard to believe that it is possible to say that a zombified dragon is beautiful, but here is the proof. What a beautiful and unique piece of art! The depth of detail and color is incredidle. It is one of my favorite pieces!
Thank you Shannon! I really didn’t know how this would be received. There were many moments when I wondered it it was worth the time. But once I started I couldn’t let go. So I’m very happy that you like it.
Stunning, as always! Glad to see that one of the sources for eyes lives in my state. What was the grainy looking, grey putty-like material you used?
Hello Jenn. Thank you for the nice comment. I tore up some newspaper, added some white glue, and little purple and black paint to make the muck I was spreading. I didn’t pulverize the paper because I wanted it to look like rot. Didn’t want it too smooth.
good as always! Where can I buy good teachers like you? : ) (I hope I spelled correctly?)
Thanks Mario!
that’s freakin’ awesome!!!!
Thanks Eric! It’s always nice to hear from you.
Dan
Woow, amazing!!! Really digging it. It looks stunning in the video!
I tried making a zombi dog last year, but ended up in the bin 😦
But whith this new tricks you showed us here I may give it a go again sometime!!
What was the putty you used for the bones again…?? 🙂
Thanks Nacho. I’m happy you like this dragon. Yes, time to re-try your dog. Several times this project almost ended up in the bin! I used “cold porcelain” for the bones. Many recipes online. It worked well. The color is naturally perfect for bones.
Fantastic work! I really enjoy your posts and this zombie dragon really suprised me! What a combination!
Hi Denise. I’m glad you like this guy. Thank you for the nice remarks!
Lovely!
Thank you!
I don’t think I have the words to express just how cool this dragon is. The detail, the colour and texture of the exposed muscle, the skin colours… It’s amazing. The glowing eyes are great too. If ever there was a project that needed glowing red eyes, it’s surely a zombie dragon.
Thank you Stella! Coming from you, the master of anatomy and detail, that is a real compliment. I’m glad you like this.
Who couldn’t just love a zombi drogan???? I love that zombi drogan!!!! I can see one right now across the east field making it’s way to the farm house…. I’m going to give it some rum…… Regina
You have the right idea for a dragon visitor Regina! Have a great time!
The dragon is AWSOME
Thank you Josh!
That zombie dragon looks awesome. What was the stuff you put in his mouth and rotted flesh to make it look like that. I like how he looks like he is rotting away.
Hi Emily. I just tore up some newspaper, added some white glue and a tiny bit of purple paint, and then mashed it with a fork.
What about the clear stuff you painted in his mouth to give it that sticky look.
That is “Clear Casting Resin”. Basically liquid plastic.
Thank you the detail is amazing. I feel like i can smell it.
You are funny. You can smell that casting resin for weeks after.
What amazing work. I am a clay artist but want to try more in paper mache.
Great video, do you have any dragon videos that decribes the work you are doing?
What do you use for the slobber?
Hello Christoph. I have tutorials on masks, but not dragons. But you can see my build many step-by-step here on this blog. And I have how-to books. It all there. I use fiberglass casting resin for slobber. It looks great I think.
Good luck!
what are you useing to hold the teeth in? It looks like some kind of putty or clay also what do you use for the scales is it some kind if fabric? Its all held in buy paper mache and epoxy resin?
what are you useing to hold the teeth in? It looks like some kind of putty or clay also what do you use for the scales is it some kind if fabric? Its all held in buy paper mache and epoxy resin? Do you sell your dragons and about how much. Thank you for your time to answer my questions im just so fascinated in your art work.
I found your work by google images, do you have a website wth all you work?
Your work inspires mevso much. Thank for everything, keep uo the great work!!
Varias dudas, en este dragon cual es el tamaño exacto de los dientes grandes de la parte de arriba? en “cm” porfavor me lo podias decir?
2-y como consigues ese tono de color en los dientes? porque si yo los dejo mas tiempo en el horno y salen marrones oscuros pero no asi amarrillentos como a ti, como lo haces?
Hello, im really looking forward in buying your books but unfortunately i am flat broke, im sure you know the term stuggling artist. As soon as i sell some art work ill buy your books. I was wondering one thing what is it that you use to build up the dragon head and hold the teeth in?
Is it some kind of clay or a form of dough? Sorry to keep dothering you about it but i am just so intrigued by your work and like to challange my self and try to make a dragon for my daughters birthday.
Thank you for all your help
Christoph
In this project, because I was simulating a skull, so I used “cold porcelain”, basically corn starch and white glue. Many recipes online. Good luck!
I know exactly what use mean i made some before. That will make thing so much easier thank you for the help and responding back so fast.
Thank you much.
Christoph
I don’t use that on all my projects, just the Zombie. Normally I make the jaws using just the cloth mache and paint. Have fun!
Una cosa Dan!! como consigues que no se rayen los ojos cuando los limpias de pintura? porque a mi siempre se me rayan….puff
Por eso utilizo ojos de cristal. Así que lo que no pican.
Hello, im trying to make a light weight clay for the bones shown on your piece. I thought you wrote something about using some kind of air dry porcelain. I have tried many times to make a light weight substances but everything turns out so heavy, as for the porcelain i just can not get right. Do you have a recipe that you use that would make a light weight material?
I would love it if you could give me a link on how to make a light weight substance.
Thank you so much for all your help.
MetalMorph studios.
Christoph
Hello Christoph. I used Cold Porcelain for the bones on this project. I used a video on Youtube. I don’t remember which one, but there are many. There is a video that does a good job comparing the three main substances people use, cold porcelain, paper clay, and polymer clay. https://www.youtube.com/watch?v=ZeZUOpkmEwU Iv’e used all three. I think you’ll have to experiment with them all to see which one you like. Those are the only substances I know about. Good luck
Shame the camera doesn’t pick up the color too well, but I think it did a good job of it in one scene of the red dragon being used in the drawing. Still loving the art!
Thank you as always Grumpmeister!
I love this ! You are so talented and so creative. I love all your work.
I bought one of your books the other day , sat and read through the whole book (witch was writing wonderfully ) twice. Then today I started to make a pumpkin and I’m loving it……well I think I’m going to be absecesed.
I can’t wait to finish and send you pictures.
Thank you for sharing your talent .
Thanks Patricia! I really appreciate the kind remarks. I would love to see your pumpkin. Good luck on your projects!