
Hey all. Okay, so my timing isn’t perfect. I certainly meant to finish all of these posts before I finished the video of this project. But I was quickly approaching the deadline for shipping, and I promised the Kitty Bungalow that I would also make one of my time-lapse videos to help in promotion. So I quickly finished the video before getting to more posts. I’m sorry to anyone who is bothered by that. So….you can pretend that the project isn’t finished and just read my posts as I get to them. Or you can watch the video and be done with it. Or some combination of the two. However I’m not going to give you a link to the video until the end of these posts. Because that’s where it’s supposed to be.
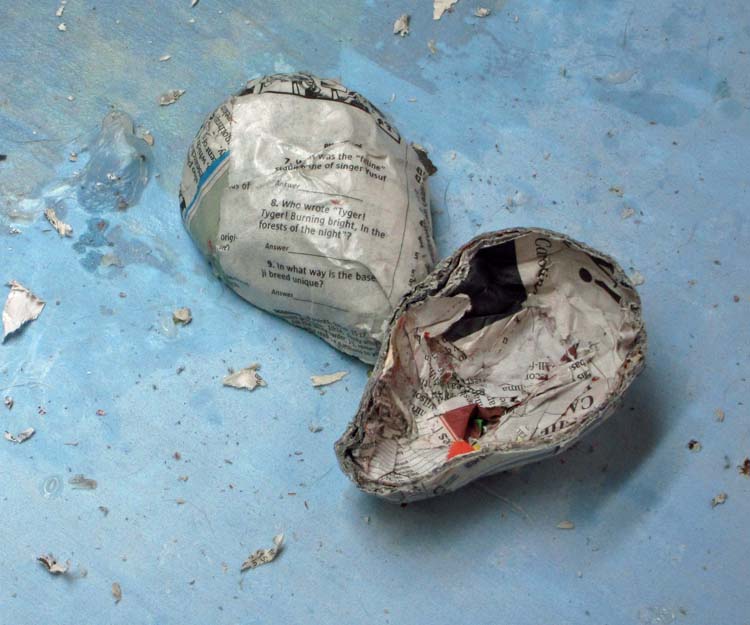
Anyway, I’ll finish the posts as quickly as I can. Only a couple more after this. We left off with the project being headless. A bad place to leave something. As always, I built the head around the shell of a paper mache ball. I cut one open and pulled out the wad of paper inside. Then I bent the pieces into the shapes I wanted. You can see that I went from a round ball, to a more cat-like set of jaws.

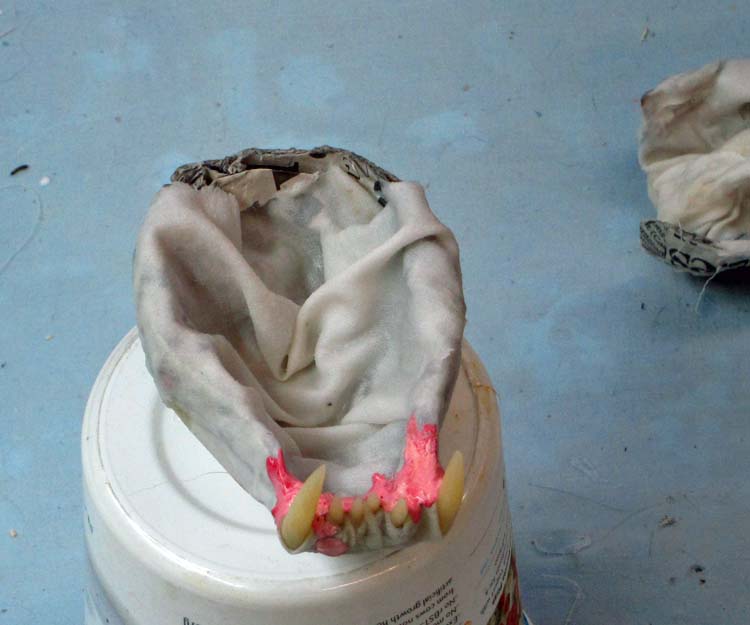
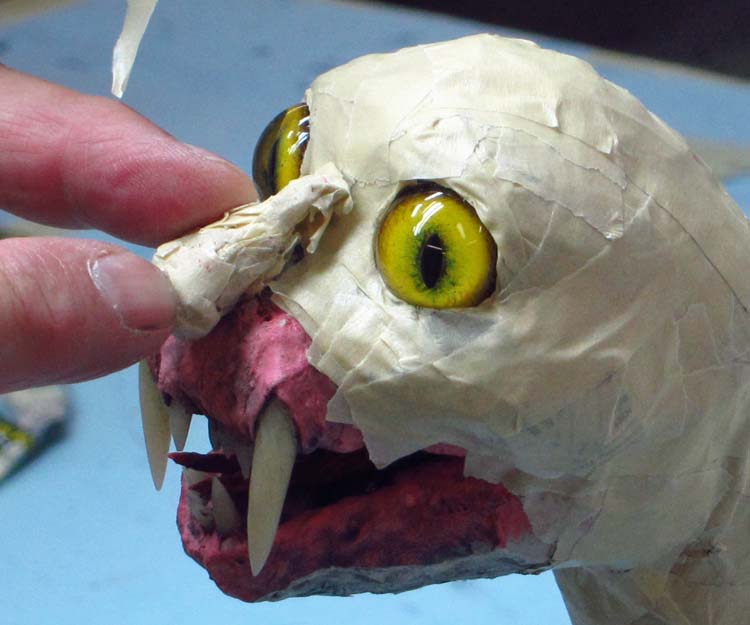
Next I used hot glue to set the teeth. The mouth will be mostly closed so I didn’t need many. But I definitely wanted prominent fangs for this guy.

As I’ve said a dillion times in my books and posts, I always paint the jaws first. Much easier than trying to do so after it’s assembled. I liken this to sealing the lumber of the deck you might be building BEFORE you build it. No one wants to do it in that order. It’s much more fun to just build and then worry about sealing later. (For some people, that means never getting to the sealing which means you will be building the deck all over again in a few years.) Trust me, if you seal the boards first and then build with the sealed boards the deck will be much better protected and you will feel much more satisfied when it’s done. The bonus is that it will also last years longer. This is called delayed gratification, something not taught in America. So….paint your jaws first! (then build your deck)
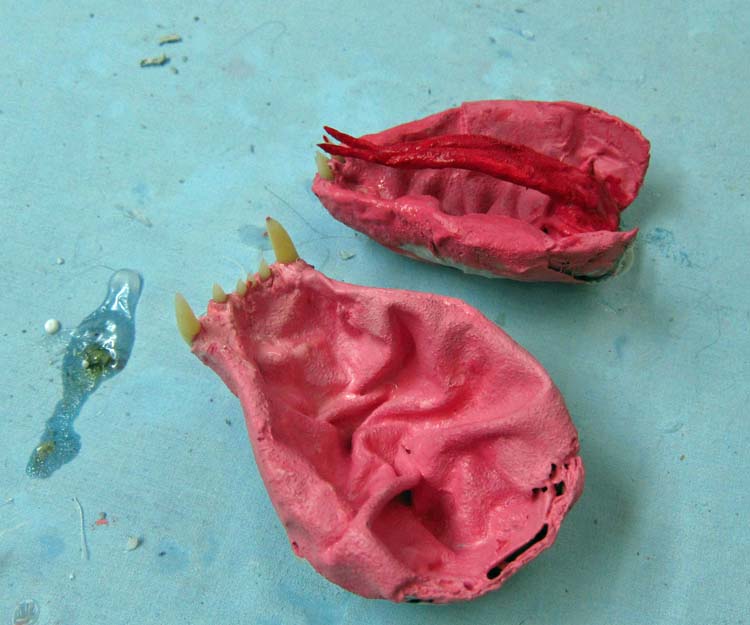
Note that I added a little tongue. Best to also do that at this stage. I don’t think it will show, but I added one just in case I change my mind and want his mouth to be open wider.
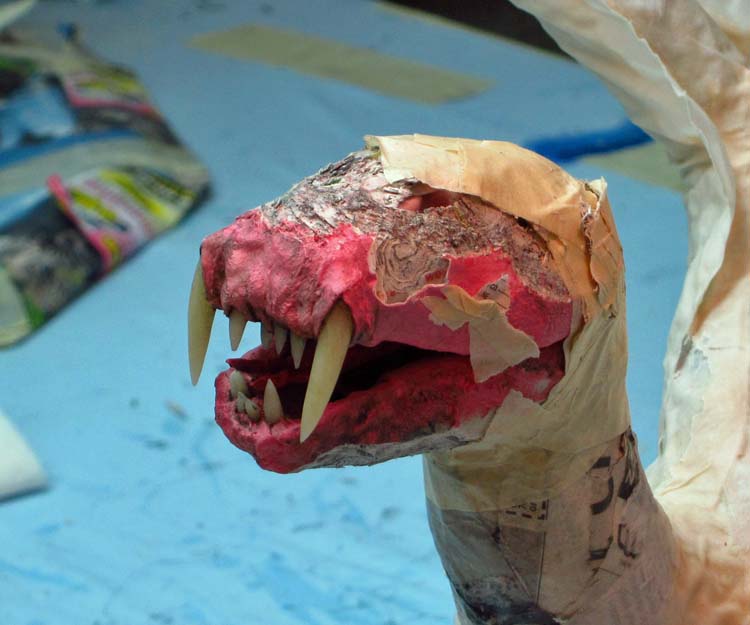
I taped the two halves of the jaws together (at the back) before adding it to the project. Looked about right.


I have to admit that I tried several times to get the forehead right. I got frustrated and didn’t take any photos of the trials. Sorry, it was all I could do to just keep from pulling the head off and squashing it with my foot. Basically I put on several half shells for foreheads and took them off again. I have to note something here. This is the spot in this project where I knew that the head was going to look funny no matter what I did. Remember how you looked as a baby? Same thing here. It’s hard to make artistic judgements about things several steps before everything starts looking right. So, I just slapped on a forehead and decided to move on fully expecting that I might tear the head off later if I didn’t like it. Then I added the eyes.

I also played around with a few noses. This is the one I landed on. Kind of square in the front like a cat’s nose. As you can see, I use lots of masking tape. Have I told you how much I love masking tape? Yes, I know, many times.

I also used small pieces of paper mache shell to fashion some ears. Again, I used masking tape for sculpting these. Except for the fangs it started to look cat-like. I started adding some horns. All cats have horns. You just can’t see them unless you look real close.


So this is the basic shape of the dragon-like cat face. I know that it looks sort of creepy to most of you. I wanted the face to look cat like, but I also wanted it to be somewhat thin in keeping with the long, dragon-like body. Plus, I knew that I would be adding some tufts of hair on the jowls and in the ears. That will square up the face in the end and make it less gaunt. You’ll see……soon.

Next, I’ll finish adding the cloth mache to the head and paint. I’m also working on another dragon video featuring a couple of trophies I just finished. So I’ll post as soon as I can. Thanks for stopping by!
Keep making art.

It’s amazing how this early into the process your cat-like dragon really does have expression, can’t wait to see it finished.😊
Thank you Cath. Glad you like it so far!
Fabuloso!!!!!! 🙂
Thank you!
AMAZING !!! CAN’T WAIT TO SEE IT FINISHED !!!
Thank you Karen!
I’m amazed at how much you do post on your projects, sounds like you are very busy with your dragons. The cat dragon head looks great! Hope we get to see the finished critter. keep on keeping on.
I love it!
Thanks Jen!
loving it!
cant wait to see finished creation
Funny how not everyone can see their horns! I’m glad we can …
Hey Carol. You are too funny. You actually read the entire post! Hope all is well.
Lovin’ the cat.
Thanks Ralph!
Since I already promised my daughter a winged cat now I should ask about horns. Can
i head north and take a workshop from you?
Sorry, I don’t offer workshops. But horns are very easy to make. I use Fimo or Sculpey to make them. Good luck!
As always! Love it..
thank you very much for sharing
On Thu, Oct 5, 2017 at 8:48 AM, Gourmet Paper Mache Blog wrote:
> danmonsterman posted: “Hey all. Okay, so my timing isn’t perfect. I > certainly meant to finish all of these posts before I finished the video of > this project. But I was quickly approaching the deadline for shipping, and > I promised the Kitty Bungalow that I would also make on” >
You are very welcome! Thank you for reading!
it looks great!!
Thank you! Reminds me to get another post done.
Thank you foxglovenerr!
Hello.. I’m adji. Nice to view all your videos. That’s awesome. N please teach me how to make teeths… What matrial need it for make the theets.. Please…
Hello Adji. I make the teeth and claws out of polymer clay. Brands include Fimo and Sculpey.