
About jaws.
Well, I’ve been working hard on this project. I’m sure some of you are already saying, “when is he going to get to the interesting part?” And my answer would be, “never.” This isn’t quite true, but it must be clear by now that most of the work on a project like this is building the parts. I make one horn I like, then I make a dillion more. I make a few teeth I like, then I make a half dillion slightly different sizes of them, just in case I change my mind about what I want to use. And I have to stop often to gab a few chocolate chips. (Julie keeps a bag in the freezer for when she decides to make cookies. Of course I found them and every so often I sneak a handful.) (A few days later I realize there are only a few chips left in the bag and must seriptitiously get to the store and buy a replacement bag.)(I finally got caught because I bought the wrong brand.)
Anyway, it’s time to make some jaws. Perhaps the most recognizable feature of the steps I have put together for making dragons concerns the jaws. Not only are the teeth and tongue, and the mouth generally, very important to the look of a dragon, the jaws constitute the basic armature of the piece.
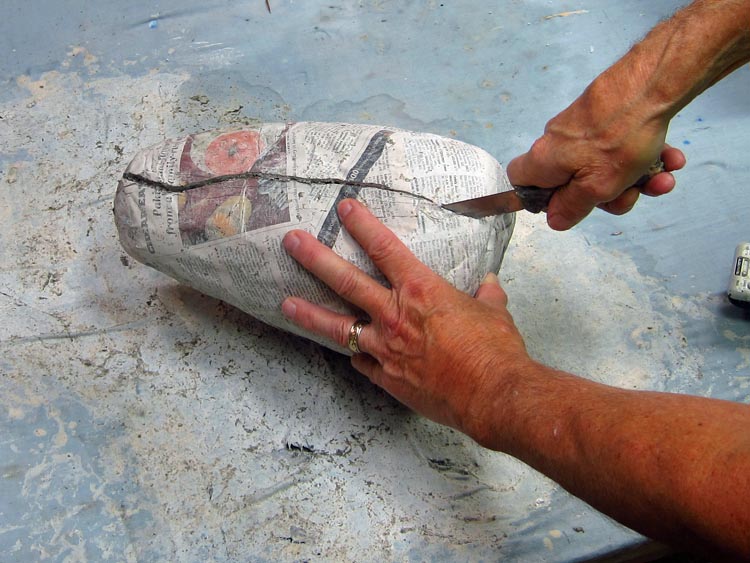
First I cut open the paper mache piece I made earlier. Then I pull out the wad of paper leaving two half shells, ie. the upper and lower jaws.


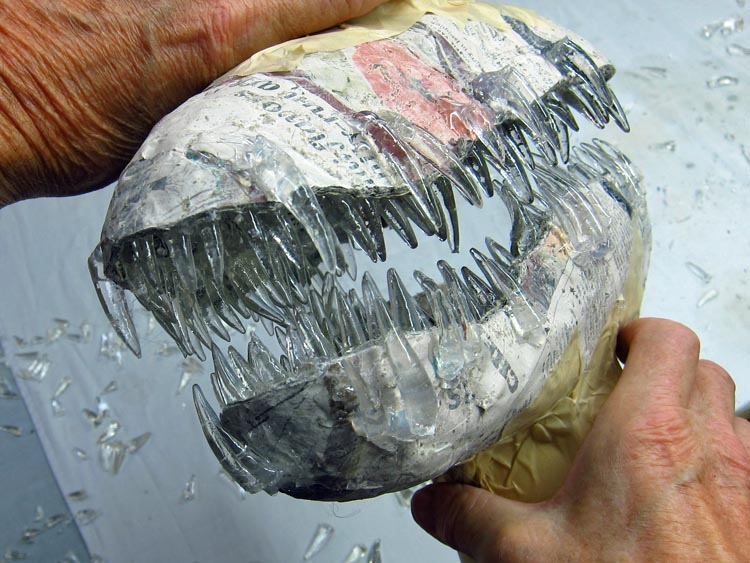
I use hot glue to attach the teeth until I can “cloth mache” them in place. More about that later. Keeping in the spirit of the Viserion drawing, I lined the insides of the jaws with teeth, then added a few on the outside as well giving the jaws a really full look.

Between the clear teeth and the large number of them I think these jaws are rather dramatic. I like them!
I need a nice tongue. I always make my tongues the same way. I twist a sheet of paper, in this case phone book paper, around two pieces of wire clothes hanger. I twist so that it tapers to a point. Then I wrap with masking tape. Once I have the two parts, I put a length of masking tape along the back. Just the back. I want to leave a crease on the top. I will accentuate that when I add the cloth.


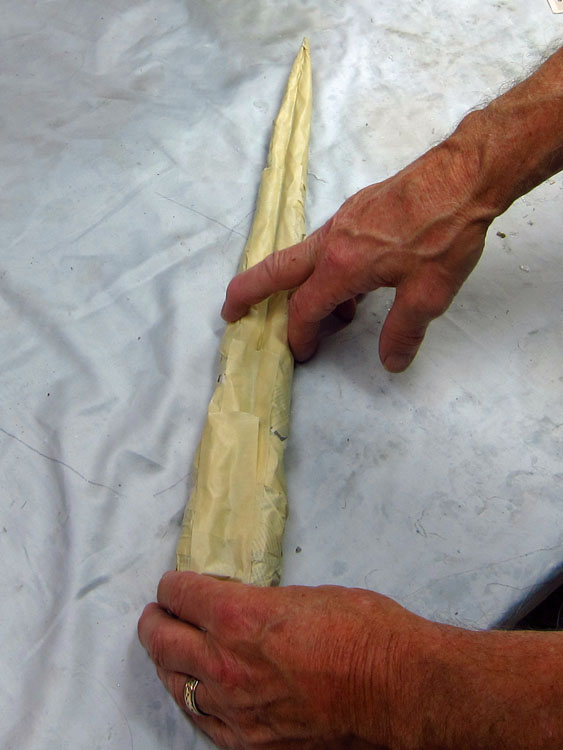
The wire in the tongue makes it easy to bend into interesting shapes. I wanted a little curl at the end of this one.

As most of you know, after sculpting with paper mache, I add a “skin” of cloth (old bed sheets) dipped in white glue. Many years ago, with the publication of my first book, I dubbed this process “cloth mache” for lack of a better term. This note that this term is used all the time now. Adding this skin to a paper mache project makes it very strong, and it allows for great detail.

I tear the old bed sheet into long strips and then cut them into shorter pieces. I use these small strips to anchor the teeth. I fold them and then wrap each tooth. The fold in the cloth is a great facsimile for gums.


Once all the teeth are wrapped, a put a large piece of glue soaked cloth in the middle of the jaw. Because the cloth is bigger than the jaw, wrinkles naturally form as you lay it. Again, this method of anchoring teeth and creating the palate with cloth is characteristic of my dragon making methods. It works very well.
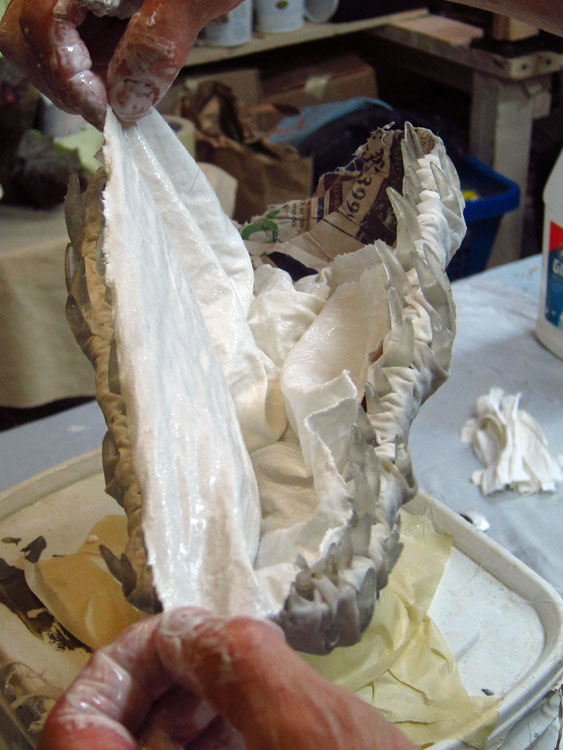

I also wrap the tongue with the cloth mache. As I mentioned, I accentuate the crease in the tongue by pushing the cloth in the gap between the two parts.

Initial Painting
I decided to keep with the dark, but very cold, color scheme in the Viserion drawing as well. So I first painted the jaws purple. Then I “blackwashed” them. That is, I painted on watered down black paint, then wiped it off before it dried. In the furniture world this would be called “antiquing.” But since I was projects with lots of different colors, it makes more sense to me to call this process blackwashing. So I do.


I painted the tongue a dark pink and blackwashed it as well.


I will stop here. There is a bit more to do with these jaws and tongue, too much for tonight. I’ll finish them off next post.
Thanks for stopping by!

Everything you do is so magical. This came today in my email and it made me think of you, even though I know you have a good stash of awesome eyeballs.
https://makezine.com/projects/simple-cabochon-follow-me-eyes/
Your such a skilled and talented and amazing sculpture and a great imaginative mind
Thank you Bridget! I have an artist friend, Gary Faye, who has made those moving eyes for a long time. They really make a project come to life! Good luck with that!
Wow those teeth are stunning, sooo different! can’t wait to see what they look like done1
Hey Sue! I think they will go very well with the frozen look of the piece. Thanks as always.
Great work!
We were in northern B.C. in the spring and Stopped at a dinosaur museum in tumbler ridge. Guess what was in there? A crazy dinosaur critter made using your cloth mâché technique! It scared all the little kids. I made sure to tell the lady working in there that this was YOUR method. It was obvious that is where the idea came from. She said “oh, this was made a long time ago.” Uhuh.
I should have taken a picture, so you could see it!
You really do inspire people everywhere!
Take care.
Lori
P.S. …your chocolate chip story was funny. I can relate when it comes to chocolate. I’m currently sneaking all the good chocolate bars, before the trick or treaters get them.
Thank you Lori. That’s a funny story! I hope it didn’t bother them too much. My wife and I had a similar experience in Vancouver, British Columbia. We were visiting for a couple days and went into a pizza place that had all kinds of “Screamers” hanging around. I could recognize them a mile away. When I mentioned it he pulled out a mangled copy of my first book, “The Simple Screamer” and we had a good laugh. He also gave us a free lunch. I’d love to know if the place is still there.
You are funny with the chocolate. I’m having the same issue tonight. I was sworn not to touch the “good candy” until the evening is over. Problem is in defining “good”. Some people somewhere might not like Twix bar! Bad candy! I had to get rid of a few!
The paper mâché dinosaur at the museum was pretty cute. I don’t know what is with those silly Canadian kids being scared of it. (I’m allowed to say that, I’m Canadian 🙂
Free lunch! That’s great.
What was the name of the pizza place? My brother works in Vancouver and I can ask him if he knows about it.
That book is from 1984 isn’t it? That’s a few years back!
Yeah, sure, nobody likes twix bars, haha.
Sorry, it was so long ago. I have no idea what the name of the restaurant was. Yes, The Simple Screamer was first published in 1984. It was in print for about 25 years and sold around the world. Who’d of thought.
Thank you so much for this. I am trying to make a fell beast from Lord of the Rings for a cosplay next year, so your videos have just blown up my minds eye on what I want to do. I just hope I have the talent to do it
Hey Jeremy. Thanks again! Good luck with your project!
Fantastic Dan, and as usual, love your humour. I have your first books, one of them you signed for me, I think it is the Dragon one, but I also have another one that came after it. Great books with heaps of humour and great pix. Thanks for keeping us up to speed with your wonderful work. I am a fan forever. Lesley from Australia.
Hey Lesley. It’s very nice to hear from you! I hope all is well down under! Thank you for the nice remarks as always. I’m very flattered. Take care
Hello friend, do you make dragon on order? Send to another country?
I do make some dragons to order. But if you live outside the US the shipping makes it too expensive. It would double the price of the dragon. Sorry, I have no control over shipping costs.
Hi Dan,
This dragon turned out really wonderfully. I’ve been wondering for ages about this step though. I am now on my 3rd dragon inspired by your art and process but I always want to have my whole dragon together before I really go into any detail. I feel like I need to get the whole head/neck mapped out to know for sure what size and shape I want my jaws to be. This causes problems later down the road like top jaws sagging because of lack of strength. Do you have any advice for how you lock down the jaw shape before putting it together either everything else? Thanks!
Hello Kelly. I’m sorry, I don’t understand what you are asking. I always make the jaws first. After adding the cloth mache around the teeth and inside the jaws they are always very strong. I have never had them change shape once everything else is sculpted. Those jaws become the base of the trophy. Everything else gets added to those jaws. Of course I can always make changes if I want later. So I’m not sure what you mean about “locking down” the shape. Sorry.
I guess I mean, how do you plan the jaws and other pieces so that they fit together and end up in the shape you want/envision for the sculpture as a whole? I tried starting like you but I always end up tearing things apart and adding bits to change them whereas you seem to have such an efficient process. Maybe it just comes with a lot of practice?
I think the jaws are primary. Everything is built upon them. So I sculpt the jaws the way I want them before I move on. Once I get them the way I want them I sculpt from there. But make no mistake, I make changes if I don’t like something later on. I don’t always show those in the videos. That’s the beauty of this medium, that you can make changes up to the very end. I used to say that the only difference between me and others who try this is that I am willing to put my hands in the glue on more time. I enjoy the process. Every part, even what many people would think of as the tedious parts. It is true I suppose that I’ve also had many years of practice. I don’t know if any of that helps. Have fun!
Yes that helps a bit. It’s nice to know that you have to make changes too! I guess I just need to shift my mindset a little. I definitely enjoy the process also, with the occasional exception of scales…but they are worth it!
my daughter has a project for school and I would like to make her a full dragon. Can you help me with a step by step tuturial please. Just tell me what I need and steps to doing and I would be grateful
Hello Domonique. I do not have time to provide individual instruction. But just like the instructions you are seeing here for this trophy, I show full dragons being made also on this blog. Look under “older paper mache projects.” They show my step-by-step process with commentary. Also, I have many time-lapse videos on Youtube showing full dragons being made. If you look at the blog along with the videos my methods are pretty clear. Of course I also have instructional books that you can find those on my website.
Good luck!