
Okay, I know I said I’d do horns next. But I decided I wanted a layer of cloth skin on the head first. It would be a much better surface for using hot glue to apply the horns. So a quick cloth mache on the face.
I always fold the cloth to use for eyelids. I usually do under the eyes first.

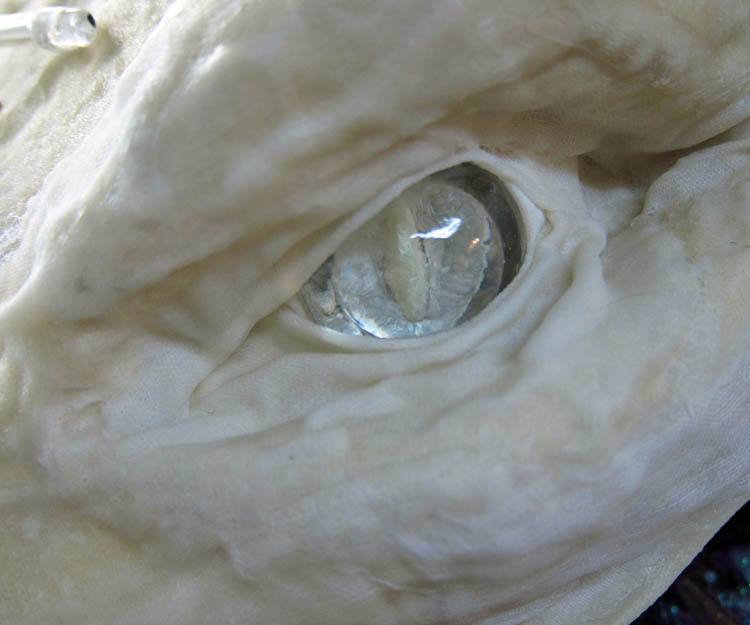
Then over. The nice thing about wrapping eyes with the cloth is that wrinkles occur naturally adding a touch of realism.


I fold a long strip of cloth for lips, then fill in above them with pieces of cloth.

I push a large square piece of cloth into the nose and piddle around until I get the shape of nostril I like.


I’m very happy with the way the eyes look with the lights off. The clear cast resin with irises and pupil ground from the back with a Drumel have a nice look to them.
Okay, horns next. I promise.

So gorgeous!
Thank you!
Such an artist!!!
On Dec 6, 2018 1:11 PM, “Gourmet Paper Mache Blog” wrote:
danmonsterman posted: “Okay, I know I said I’d do horns next. But I decided I wanted a layer of cloth skin on the head first. It would be a much better surface for using hot glue to apply the horns. So a quick cloth mache on the face. I always fold the cloth to use for”
Thank you Shilodog!
Wow, just look at those eyes! This guy’s going to be absolutely amazing when he’s finished.
Thanks as always Stella! Hope all is well.
Thanks. Yes, I’m well. Even managed to get a blog post up recently in amongst all the work madness.
I love seeing the creation process. Dragons are one of my favorite subjects and this is both fascinating and beautiful.
Yes, there are unlimited dragon options. It’s why it’s hard to stop making them! Thanks Pamela!
The eyes and nostrils look so amazing, really makes him real. I’ve learned so much just from your posts on this guy!
Pingback: See How Paper Maché Sculptor Uses Cloth for Tricky Spots | Hackaday
Thank you so much for the nice remarks about my techniques Donald! You are very kind.
Pingback: See How Paper Maché Sculptor Uses Cloth for Tricky Spots – MasMaz
Pingback: See How Paper Maché Sculptor Uses Cloth for Tricky Spots – Sloppy Laughs
Pingback: See How Paper Maché Sculptor Uses Cloth for Tricky Spots – Ans Info
I came across your art from another site and all I can say is… WOW! Your work is absolutely breathtaking! Is there a link anywhere to know the recipes and materials you use for your mix and what would you recommend to waterproof your pieces once complete? I just subscribed to your YouTube channel and I am so excited to see each video!
Glad you like the work Jennifer! I don’t really have many recipes. I use flour and water (in about equal measure) for the paper mache paste with the newspaper, and I use white glue (I like Elmer’s) full strength for the cloth “skin”. I have never found a topical sealer that works for paper mache. The closest I’ve been able to come to helping with the weather is exterior grade white glue and paints labeled “exterior” enamels. I don’t believe that paper mache will hold up permanently. It’s just the nature of paper to absorb moisture from he air. Good luck!
Hi, my son and I are big fans of your channel and we are having a go at making our very own papier mâché dragon, following your instructions 🙂 i was tempted to get plaster cloth strips but then realised, from carefully stalking you on YouTube, that your strips of cloth look very smooth and not all rough like plaster cloth. Would you mind sharing with us what kind of cloth you use, as the effect in the mouth and around the eyes is just stunning! Thanks for all the content you put out there 🙂
Hello Noemie. Sounds like you are having a great time! It’s very nice of you to do such a project with your son. I use old bed sheets for my “cloth mache” skin. I never check the tag so I don’t know what blends I’m using. I just prefer the oldest, most worn sheets I can find. The more worn the more malleable it will be. Of course I dip it in white glue (no water added). I have to warn you however that the “smooth” finish is a bit of an illusion. It will dry with air bubbles and some wrinkles. I think that it works great for dragon finishes, but don’t expect really smooth surfaces. Still, it will be much better than plaster cloth which is very heavy and does have an extremely rough surface. Good luck!
Thank you very much 🙂 you made my son’s day by responding to us 😀 I have a lot of rags somewhere, I will sort through them 🙂 Do you have any tips to share on attaching the head on the neck?? Im a bit worried it might not hold on very well 😀 Thanks again!
I just use masking tape to hold the head on the neck until I do my cloth mache skin. I’ve never had any trouble with that not working. Good luck!
Good to know! Thank you so much!
I just started following you. Do you sell your work or take orders? If not I think I will try and give it a shot at making one of these beautiful creatures. I would love to have them on my walls.
Hello Jay. I do commissions once in a while. However I’m not doing anything currently. I’m just trying to finish some of the projects I’ve started but have sat for a while. You should definitely give it a try. You can see many pages of the ones people have made on my site. They are great. I guarantee you would enjoy one you made yourself much more than one you could get from me.
Good luck!